> ## Documentation Index
> Fetch the complete documentation index at: https://togetherai-migration.mintlify.site/llms.txt
> Use this file to discover all available pages before exploring further.
# How To: Fine Tuning
> Learn details on how to use your own private data to fine-tune a custom LLM.
Fine-tuning LLM is the process of improving an existing LLM for a specific task or domain. You can improve an LLM by giving it a set of labeled examples for that task which it can then learn from. The examples can come from public datasets on the internet, or private datasets unique to your organization.
Together facilitates every step of the fine-tuning process. You can use our APIs for the following:
1. Uploading your own datasets to our platform
2. Starting a fine-tuning job that fine-tunes an existing LLM of your choice with your uploaded data
3. Monitoring the progress of your fine-tuning job
4. Hosting the resulting model on Together or download it so you can run it yourself locally
Together supports both **[LoRA](https://arxiv.org/abs/2106.09685) fine-tuning** and **Full fine-tuning** for next-token prediction. Get started fine-tuning a LLM with the following steps!
## Choosing your model
The first step in fine-tuning is to choose which LLM you want to use as the starting point for your custom model.
All generative LLMs are trained to take some input text and then predict what text is most likely to follow it. While **base models** are trained on a wide variety of texts, making their predictions broad, **instruct models** are trained on text that's been structured as instruction-response pairs – hence their name. Each instruct model has its own structured format, however you only need to pass in the `prompt` and `completion` pairs - please refer to the data format details [here](/docs/fine-tuning-data-preparation#instruction-data).
If it's your first time fine-tuning, we recommend using an instruct model. *Llama 3 8b instruct* is great for simpler training sets, and the larger *Llama 3 70b instruct* is good for more complicated training sets.
You can find all available models on the Together API [here](/docs/fine-tuning-models).
## Preparing your data
Once you've chosen your model you'll need to save your structured data as either a [JSONL](https://jsonlines.org/) file or a [Parquet](https://www.databricks.com/glossary/what-is-parquet) file (tokenized).
### Which file format should I use for data?
The example packing strategy is used by default for *training* data if a JSONL file is provided. If you'd like to disable the example packing for training, you can provide a tokenized dataset in a Parquet file. [This example script](https://github.com/togethercomputer/together-python/blob/main/examples/tokenize_data.py#L34) for tokenizing a dataset demonstrates padding each example with a pad token. Note that the corresponding `attention_mask` and `labels` should be set to 0 and -100, respectively, so that the model essentially ignores the padding tokens in prediction and excludes them in its loss.
JSONL is simpler and will work for many cases, while Parquet stores pre-tokenized data, providing flexibility to specify custom attention mask and labels (loss masking). It also saves you time for each job you run by skipping the tokenization step. [View our file format guide](/docs/fine-tuning-data-preparation) to learn more about working with each format.
### Loss masking
The Together Fine-tuning API trains a model using the same cross-entropy loss as used during pre-training (in other words, by predicting the next token). If you provide a JSONL file, the loss will be calculated for every token, regardless of your custom task and prompt format. However, in some cases you may want to fine-tune a model to excel at predicting only a specific part of a prompt. For example, if you want to fine-tune a model to answer a short question followed by a long context, the model doesn’t need to learn to generate the entire context and the question. Penalizing its prediction for the context and question could lead to ineffective training for your answering task.
By providing a custom `labels` field for your examples in the tokenized dataset (in a Parquet file), you can mask out the loss calculation for specified tokens. Set the label for tokens you don’t want to include in the loss calculation to `-100` (see [here](https://pytorch.org/docs/stable/generated/torch.nn.CrossEntropyLoss.html#torch.nn.CrossEntropyLoss) for why). Note that unlike padding tokens, you still set their corresponding `attention_mask` to 1, so that the model can properly attend to these tokens during prediction.
### Train and Validation Split
You can split a JSONL file for training and validation, by running the following example script. For more information about using the validation set, see [here](/docs/fine-tuning-overview#evaluation) :
```sh Shell theme={null}
split_ratio=0.9 // Specify the split ratio for your training set.
total_lines=$(wc -l < "your-datafile.jsonl")
split_lines=$((total_lines * split_ratio))
head -n $split_lines "your-datafile.jsonl" > "your-datafile-train.jsonl"
tail -n +$((split_lines + 1)) "your-datafile.jsonl" > "your-datafile-validation.jsonl"
```
### File Check
Once your data is in the correct structure and saved as either a `.jsonl` or `.parquet` file, use our CLI to verify that it's correct:
```sh CLI theme={null}
together files check "your-datafile.jsonl"
```
You'll see an object that looks like the following:
```JSON JSON theme={null}
{
"is_check_passed": true,
"message": "Checks passed",
"found": true,
"file_size": 781041,
"utf8": true,
"line_type": true,
"text_field": true,
"key_value": true,
"min_samples": true,
"num_samples": 238,
"load_json": true,
"filetype": "jsonl"
}
```
If your data file is valid, you'll see `is_check_passed: true` in the response.
You're now ready to upload your data to Together!
## Uploading your data
To upload your data, use the CLI or our Python library (our TypeScript library currently doesn't support file uploads):
```sh CLI theme={null}
together files upload "your-datafile.jsonl"
```
```py Python theme={null}
import os
from together import Together
client = Together(api_key=os.environ.get("TOGETHER_API_KEY"))
resp = client.files.upload(file="your-datafile.jsonl")
print(resp.model_dump())
```
You'll see the following output once the upload finishes:
```json JSON theme={null}
{
"id": "file-5e32a8e6-72b3-485d-ab76-71a73d9e1f5b",
"object": "file",
"created_at": 1713481731,
"type": null,
"purpose": "fine-tune",
"filename": "your-datafile.jsonl",
"bytes": 0,
"line_count": 0,
"processed": false,
"FileType": "jsonl"
}
```
You'llbe using your file's ID (the string that begins with "file-") to start your fine-tuning job, so store it somewhere before moving on.
You're now ready to kick off your first fine-tuning job!
## Starting a fine-tuning job
We support both LoRA and full finetuning – see how to start a finetuning job with either method below.
### LoRA fine-tuning
**(Supported with`together >= 1.2.3`)** Call `create` with your file ID as the `training_file` to kick off a new fine-tuning job. Pass `--lora` for LoRA fine-tuning:
```sh CLI theme={null}
together fine-tuning create \
--training-file "file-5e32a8e6-72b3-485d-ab76-71a73d9e1f5b" \
--model "meta-llama/Meta-Llama-3-8B" \
--wandb-api-key $WANDB_API_KEY \ # Optional
--lora
```
```py Python theme={null}
import os
from together import Together
client = Together(api_key=os.environ.get("TOGETHER_API_KEY"))
response = client.fine_tuning.create(
training_file = 'file-5e32a8e6-72b3-485d-ab76-71a73d9e1f5b',
model = 'meta-llama/Meta-Llama-3-8B',
lora = True,
n_epochs = 3,
n_checkpoints = 1,
batch_size = "max",
learning_rate = 1e-5,
suffix = 'my-demo-finetune',
wandb_api_key = '1a2b3c4d5e.......',
)
print(response)
```
You can also specify LoRA parameters `--lora-r`, `--lora-dropout`, `--lora-alpha`, `--lora-trainable-modules` to customize your job. See the full list of hyperparameters and their definitions [here](/reference/finetune).
The response object will have all the details of your job, including its ID and a `status` key that starts out as "pending":
```json JSON theme={null}
{
"id": "ft-bb62e747-b8fc-49a3-985c-f32f7cc6bb04",
"training_file": "file-5e32a8e6-72b3-485d-ab76-71a73d9e1f5b",
"model": "meta-llama/Meta-Llama-3-8B",
"status": "pending"
}
```
### Full fine-tuning
Call `create` with your file ID as the `training_file` to kick off a new fine-tuning job:
```sh CLI theme={null}
together fine-tuning create \
--training-file "file-5e32a8e6-72b3-485d-ab76-71a73d9e1f5b" \
--model "meta-llama/Meta-Llama-3-8B" \
--wandb-api-key $WANDB_API_KEY \ # Optional
```
```py Python theme={null}
import os
from together import Together
client = Together(api_key=os.environ.get("TOGETHER_API_KEY"))
response = client.fine_tuning.create(
training_file = 'file-5e32a8e6-72b3-485d-ab76-71a73d9e1f5b',
model = 'meta-llama/Meta-Llama-3-8B',
)
print(response)
```
```ts TypeScript theme={null}
import Together from 'together-ai';
const client = new Together({
apiKey: process.env['TOGETHER_API_KEY'],
});
const response = await client.fineTune.create({
model: 'meta-llama/Meta-Llama-3-8B',
training_file: 'file-5e32a8e6-72b3-485d-ab76-71a73d9e1f5b',
});
console.log(response);
```
See the full list of hyperparameters and their definitions [here](/reference/finetune).
The response object will have all the details of your job, including its ID and a `status` key that starts out as "pending":
```json JSON theme={null}
{
"id": "ft-bb62e747-b8fc-49a3-985c-f32f7cc6bb04",
"training_file": "file-5e32a8e6-72b3-485d-ab76-71a73d9e1f5b",
"model": "meta-llama/Meta-Llama-3-8B",
"status": "pending"
}
```
### Continue a fine-tuning job
You can continue a previous fine-tuning job by specifying the `--from-checkpoint` field in the request:
```sh CLI theme={null}
together fine-tuning create \
--training-file "file-5e32a8e6-72b3-485d-ab76-71a73d9e1f5b" \
--from-checkpoint "ft-bb62e747-b8fc-49a3-985c-f32f7cc6bb04" \
--wandb-api-key $WANDB_API_KEY # Optional
```
```py Python theme={null}
import os
from together import Together
client = Together(api_key=os.environ.get("TOGETHER_API_KEY"))
response = client.fine_tuning.create(
training_file = 'file-5e32a8e6-72b3-485d-ab76-71a73d9e1f5b',
from_checkpoint = 'ft-bb62e747-b8fc-49a3-985c-f32f7cc6bb04',
wandb_api_key = '1a2b3c4d5e.......',
)
print(response)
```
```ts TypeScript theme={null}
import Together from 'together-ai';
const client = new Together({
apiKey: process.env['TOGETHER_API_KEY'],
});
const response = await client.fineTune.create({
from_checkpoint: 'ft-bb62e747-b8fc-49a3-985c-f32f7cc6bb04',
training_file: 'file-5e32a8e6-72b3-485d-ab76-71a73d9e1f5b',
});
console.log(response);
```
You can specify a checkpoint by using:
* The output model name from the previous job
* Fine-tuning job ID
* A specific checkpoint step with the format `ft-...:{STEP_NUM}`, where `{STEP_NUM}` is the step on which the checkpoint was created
To check all available checkpoints for the job, use `together fine-tuning list-checkpoints {FT_JOB_ID}`.
### Evaluation
To use a validation set, provide `--validation-file` and `--n-evals` the number of evaluations (over the entire job):
```sh CLI theme={null}
together fine-tuning create \
--training-file "file-5e32a8e6-72b3-485d-ab76-71a73d9e1f5b" \
--validation-file "file-44117187-5d76-4915-9b4c-bdd73f33498e" \
--n-evals 10 \
--model "meta-llama/Meta-Llama-3-8B" \
--wandb-api-key $WANDB_API_KEY \ # Optional
```
```py Python theme={null}
import os
from together import Together
client = Together(api_key=os.environ.get("TOGETHER_API_KEY"))
response = client.fine_tuning.create(
training_file = 'file-5e32a8e6-72b3-485d-ab76-71a73d9e1f5b',
validation_file = 'file-44117187-5d76-4915-9b4c-bdd73f33498e',
n_evals = 10,
model = 'meta-llama/Meta-Llama-3-8B',
)
print(response)
```
See the full list of hyperparameters and their definitions [here](/reference/finetune).
**What is a validation set?**
A validation set is a held-out dataset to evaluate your model performance during training on unseen data. The validation set can be created from the same data source as the training dataset, or it can be a mix of multiple data sources. For example, you may include samples from various datasets to see if the model preserves its general capability while being fine-tuned for a specific task.
**How often is the evaluation run on the validation set?**
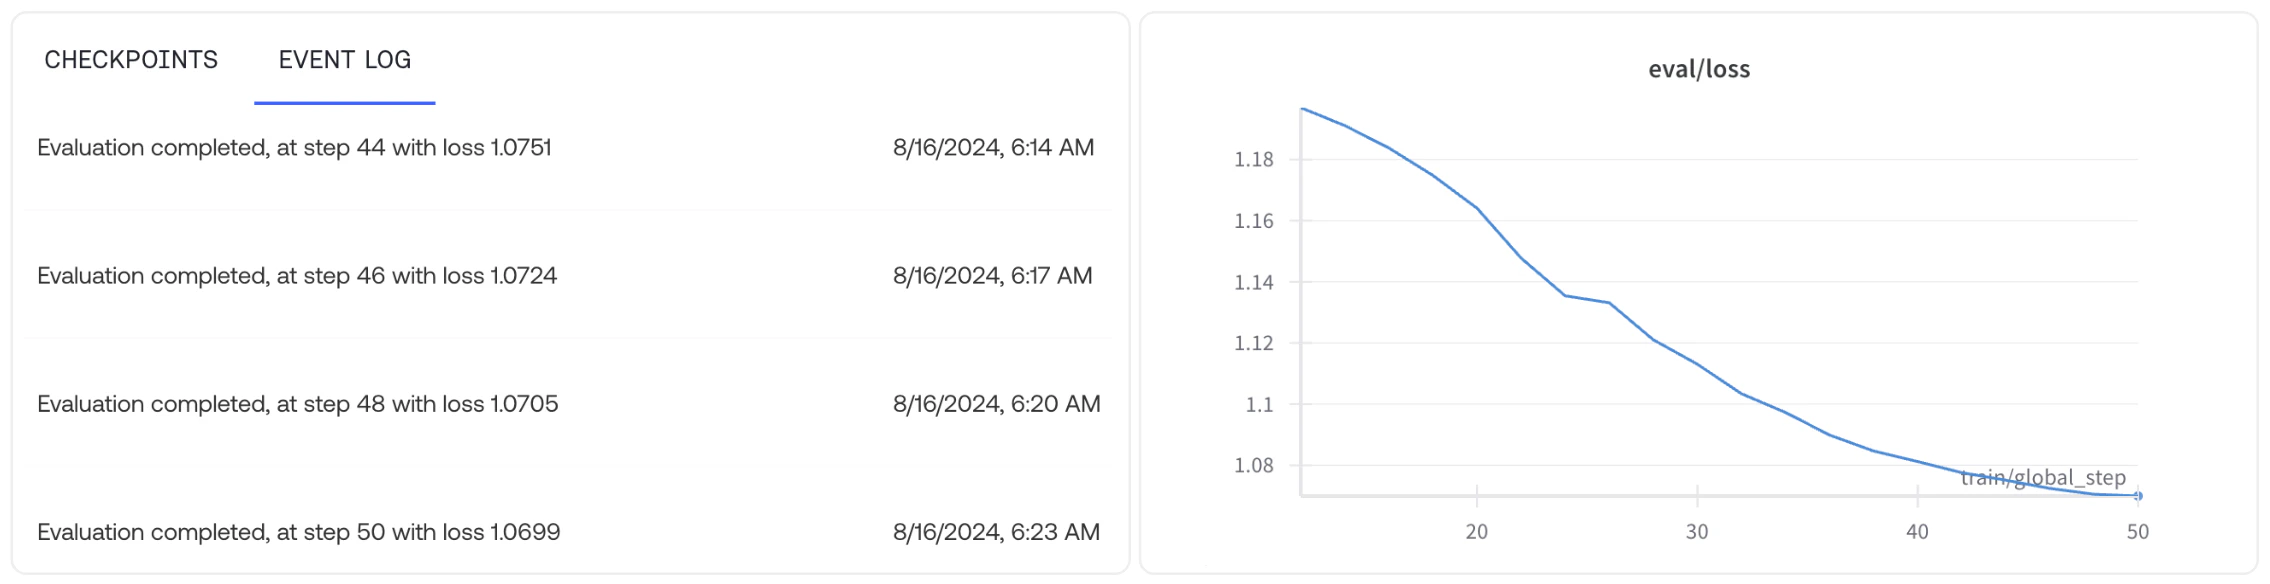
At a set number of training steps, defined by your input `n_evals`, the most up-to-date model weights will be evaluated with a forward pass on your validation set, and the evaluation loss will be recorded in your job event log. If you provide a W\&B API key, you will also be able to see the losses in the W\&B page. Therefore, the presence of the validation set will not influence the model's training quality.
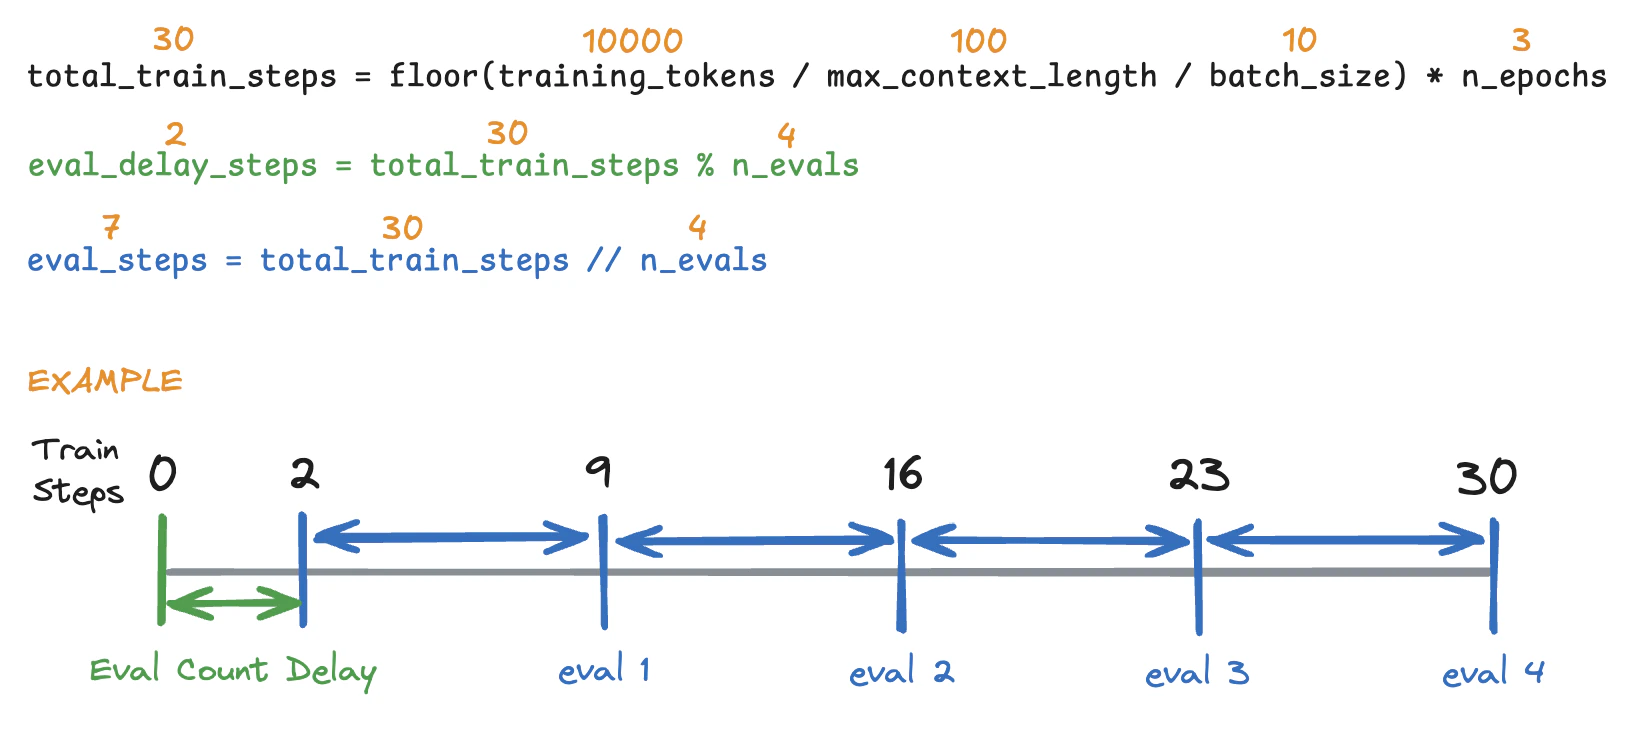
 So, when exactly is the evaluation performed? To ensure that the final weights are evaluated on the validation set, the counting for evaluation steps may start after a few training steps. In the example below, the evaluation is performed every 7 training steps with the step 9 being the first evaluation and the final step 30 being the last evaluation.
 **Why should I provide a validation set?**
Using a validation set during training provides multiple benefits such as hyperparameter tuning and examining overfitting (model performance on unseen data).
Note that the evaluation cost will be added to your final cost based on the size of your validation set and the number of evaluations. To get more details, see the [pricing](/docs/fine-tuning-overview#pricing) section.
## Monitoring a fine-tuning job's progress
After you started your job, [visit your jobs dashboard](https://api.together.xyz/jobs). You should see your new job!
**Why should I provide a validation set?**
Using a validation set during training provides multiple benefits such as hyperparameter tuning and examining overfitting (model performance on unseen data).
Note that the evaluation cost will be added to your final cost based on the size of your validation set and the number of evaluations. To get more details, see the [pricing](/docs/fine-tuning-overview#pricing) section.
## Monitoring a fine-tuning job's progress
After you started your job, [visit your jobs dashboard](https://api.together.xyz/jobs). You should see your new job!
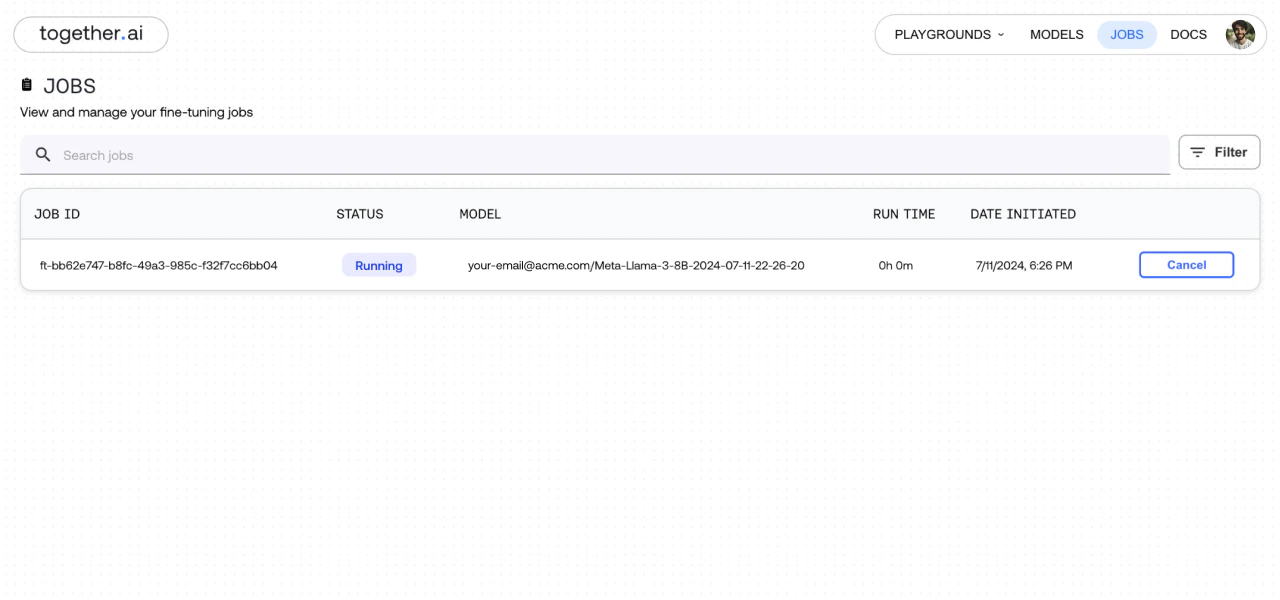 You can also pass your Job ID to `retrieve` to get the latest details about your job directly from your code:
```sh CLI theme={null}
together fine-tuning retrieve "ft-bb62e747-b8fc-49a3-985c-f32f7cc6bb04"
```
```py Python theme={null}
import os
from together import Together
client = Together(api_key=os.environ.get("TOGETHER_API_KEY"))
response = client.fine_tuning.retrieve('ft-bb62e747-b8fc-49a3-985c-f32f7cc6bb04')
print(response.status) # STATUS_UPLOADING
```
```ts TypeScript theme={null}
import Together from 'together-ai';
const client = new Together({
apiKey: process.env['TOGETHER_API_KEY'],
});
const response = await client.fineTune.retrieve(
'ft-bb62e747-b8fc-49a3-985c-f32f7cc6bb04'
);
console.log(response.status); // uploading
```
Your fine-tuning job will go through several phases, including Pending, Queued, Running, Uploading, and Completed. You can check the current status at any time by visiting [your jobs dashboard](https://api.together.xyz/jobs) or using the `retrieve` command from above. If your job is in a pending state for too long, please reach out to [support@together.ai](mailto:support@together.ai).
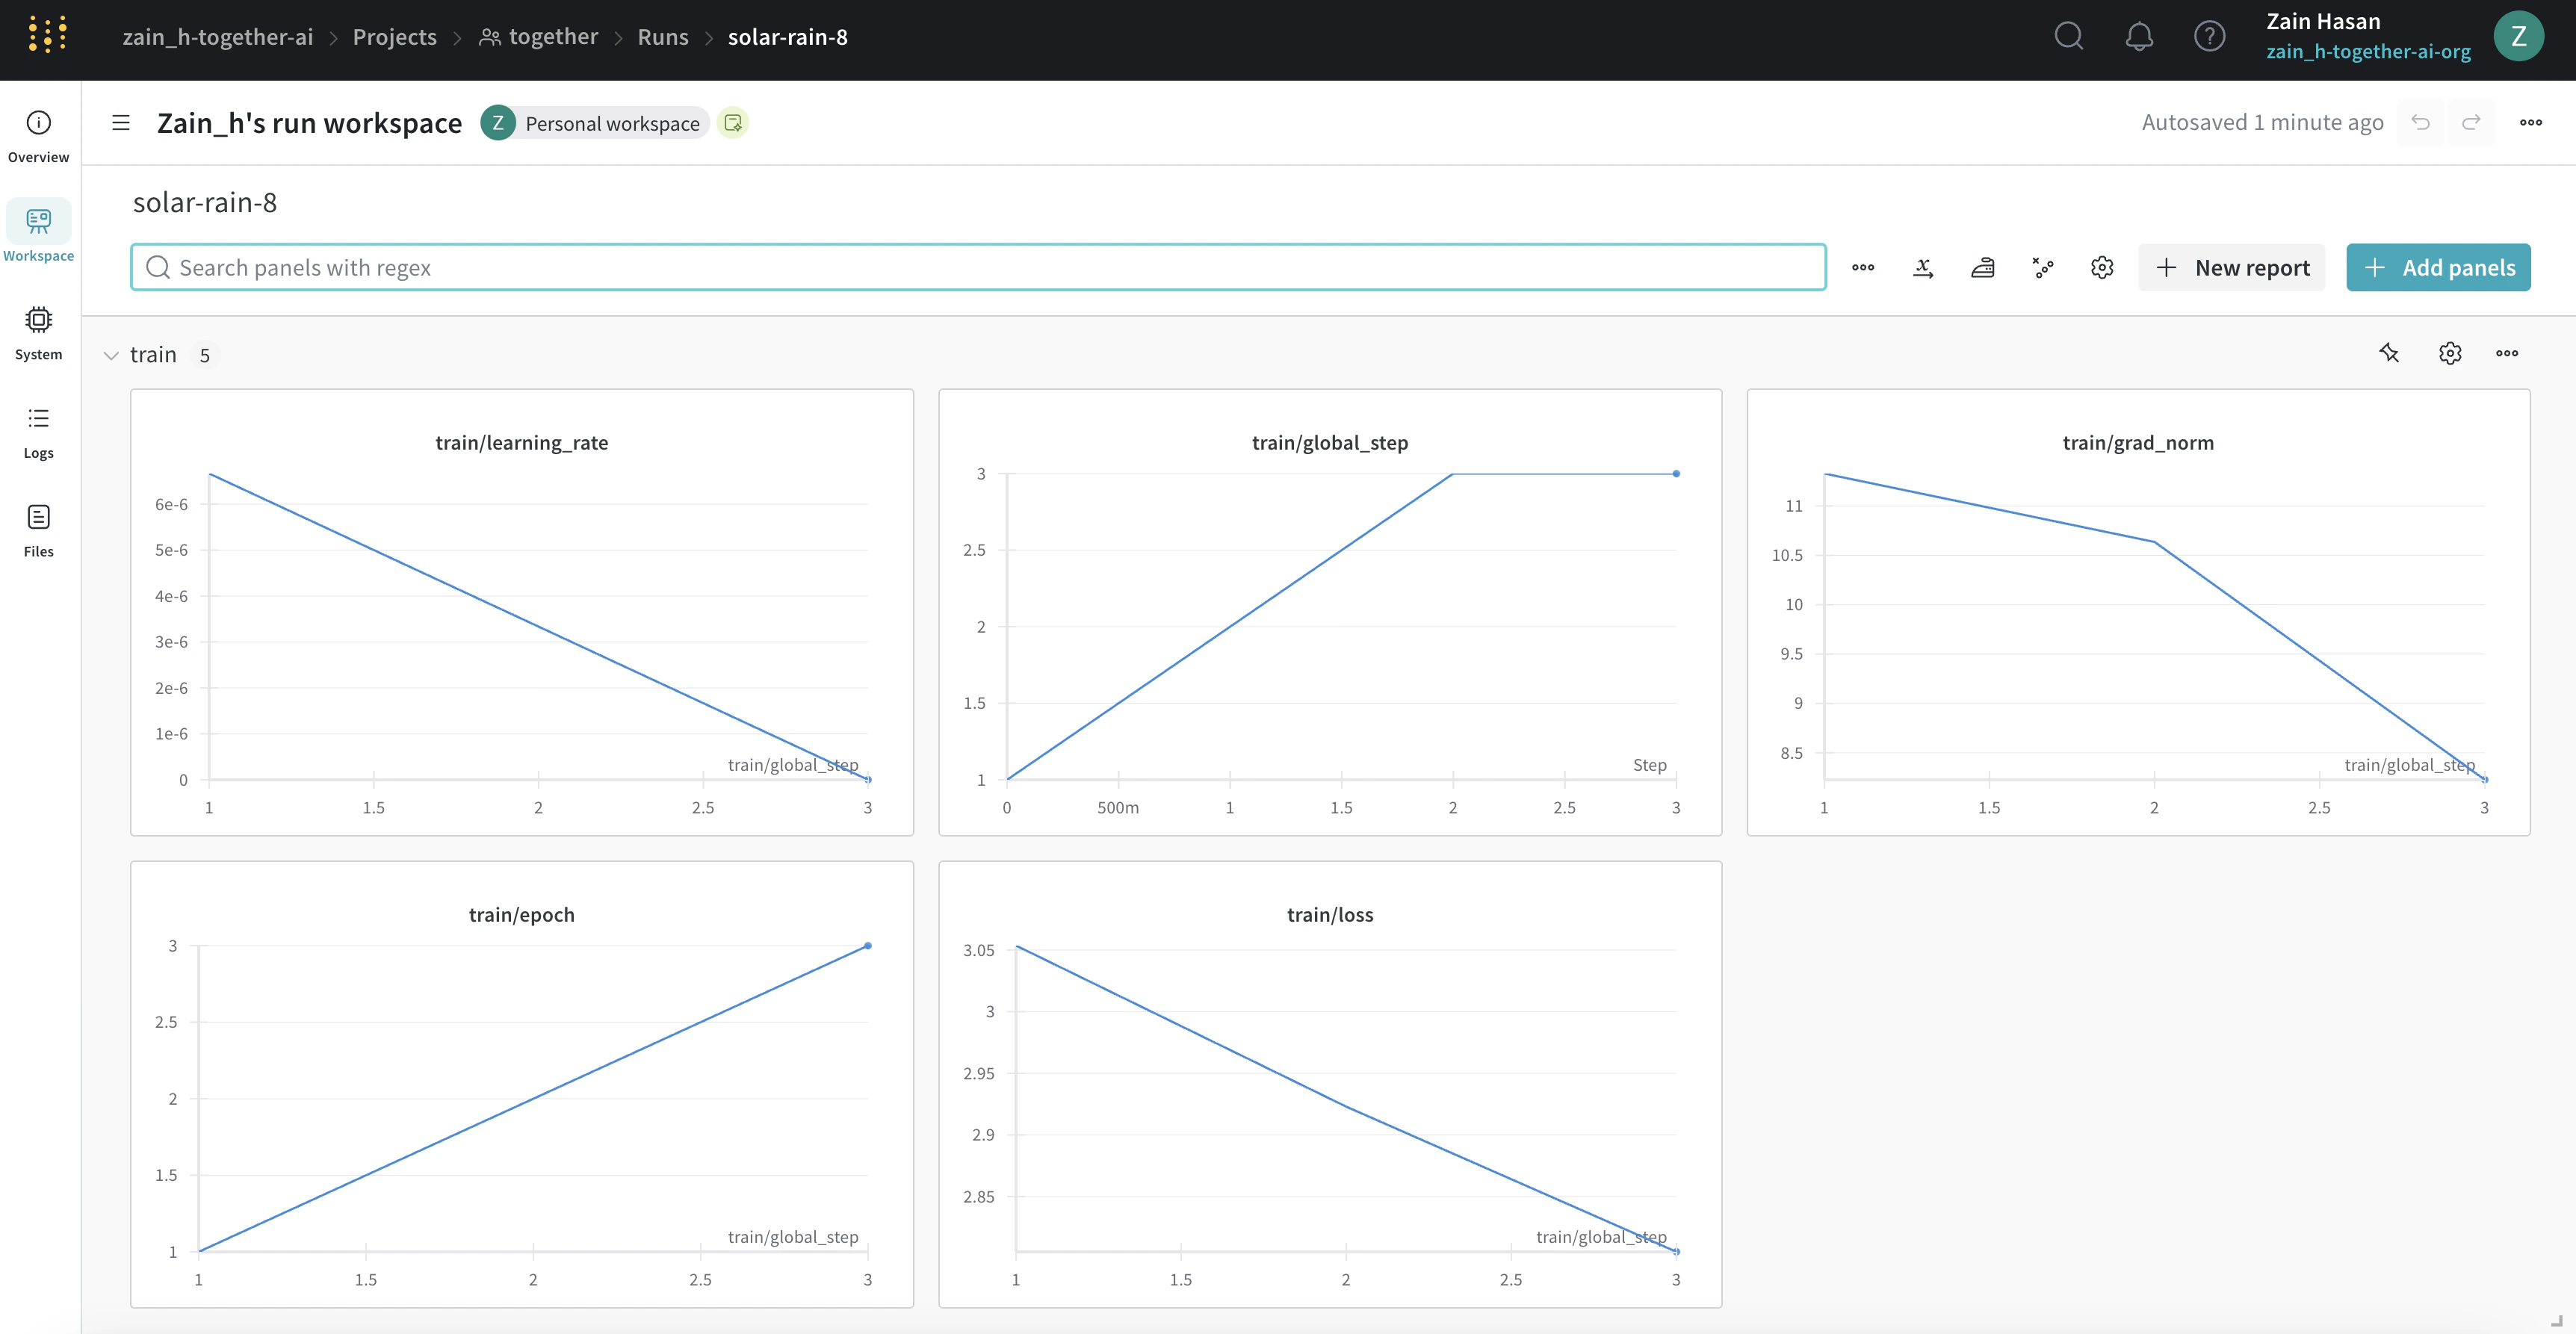
You can also monitor the fine-tuning job on the Weights & Biases platform, shown below, if you provided your API key when submitting the fine-tuning job as instructed above.
You can also pass your Job ID to `retrieve` to get the latest details about your job directly from your code:
```sh CLI theme={null}
together fine-tuning retrieve "ft-bb62e747-b8fc-49a3-985c-f32f7cc6bb04"
```
```py Python theme={null}
import os
from together import Together
client = Together(api_key=os.environ.get("TOGETHER_API_KEY"))
response = client.fine_tuning.retrieve('ft-bb62e747-b8fc-49a3-985c-f32f7cc6bb04')
print(response.status) # STATUS_UPLOADING
```
```ts TypeScript theme={null}
import Together from 'together-ai';
const client = new Together({
apiKey: process.env['TOGETHER_API_KEY'],
});
const response = await client.fineTune.retrieve(
'ft-bb62e747-b8fc-49a3-985c-f32f7cc6bb04'
);
console.log(response.status); // uploading
```
Your fine-tuning job will go through several phases, including Pending, Queued, Running, Uploading, and Completed. You can check the current status at any time by visiting [your jobs dashboard](https://api.together.xyz/jobs) or using the `retrieve` command from above. If your job is in a pending state for too long, please reach out to [support@together.ai](mailto:support@together.ai).
You can also monitor the fine-tuning job on the Weights & Biases platform, shown below, if you provided your API key when submitting the fine-tuning job as instructed above.
 When the status says Completed, your job is all done! You've just fine-tuned your first model with the Together API, and now you're ready to deploy it.
## Deploying your fine-tuned model
Once your fine-tune job completes, you should see your new model in [your models dashboard](https://api.together.xyz/models):
When the status says Completed, your job is all done! You've just fine-tuned your first model with the Together API, and now you're ready to deploy it.
## Deploying your fine-tuned model
Once your fine-tune job completes, you should see your new model in [your models dashboard](https://api.together.xyz/models):
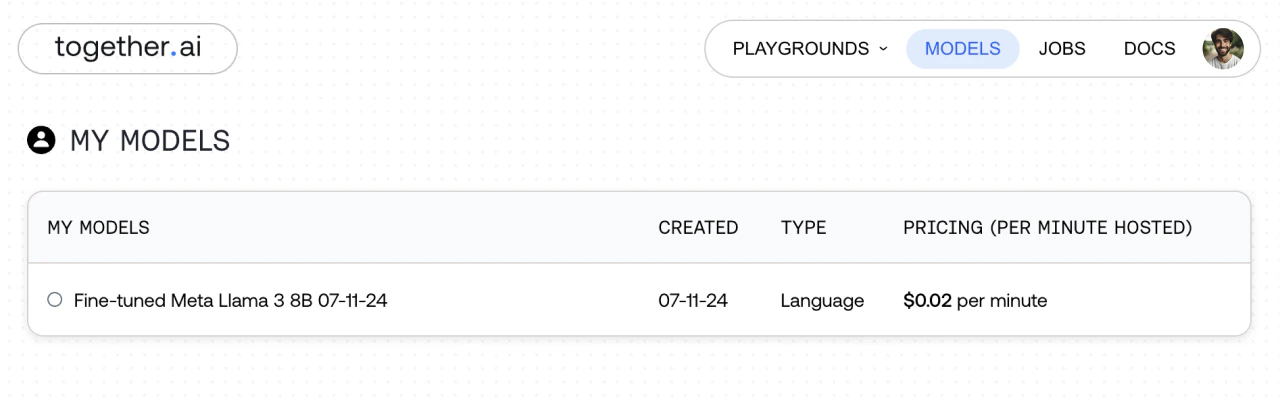 To use your model, you can either host it on Together AI for an hourly usage fee, or download your model and run it locally. Currently, there is no difference between hosting LoRA fine-tuned models and hosting full fine-tuned models.
### Hosting your model on Together AI
If you select your model in [the models dashboard](https://api.together.xyz/models), you'll see several hardware configurations that you can choose from to start hosting your model:
To use your model, you can either host it on Together AI for an hourly usage fee, or download your model and run it locally. Currently, there is no difference between hosting LoRA fine-tuned models and hosting full fine-tuned models.
### Hosting your model on Together AI
If you select your model in [the models dashboard](https://api.together.xyz/models), you'll see several hardware configurations that you can choose from to start hosting your model:
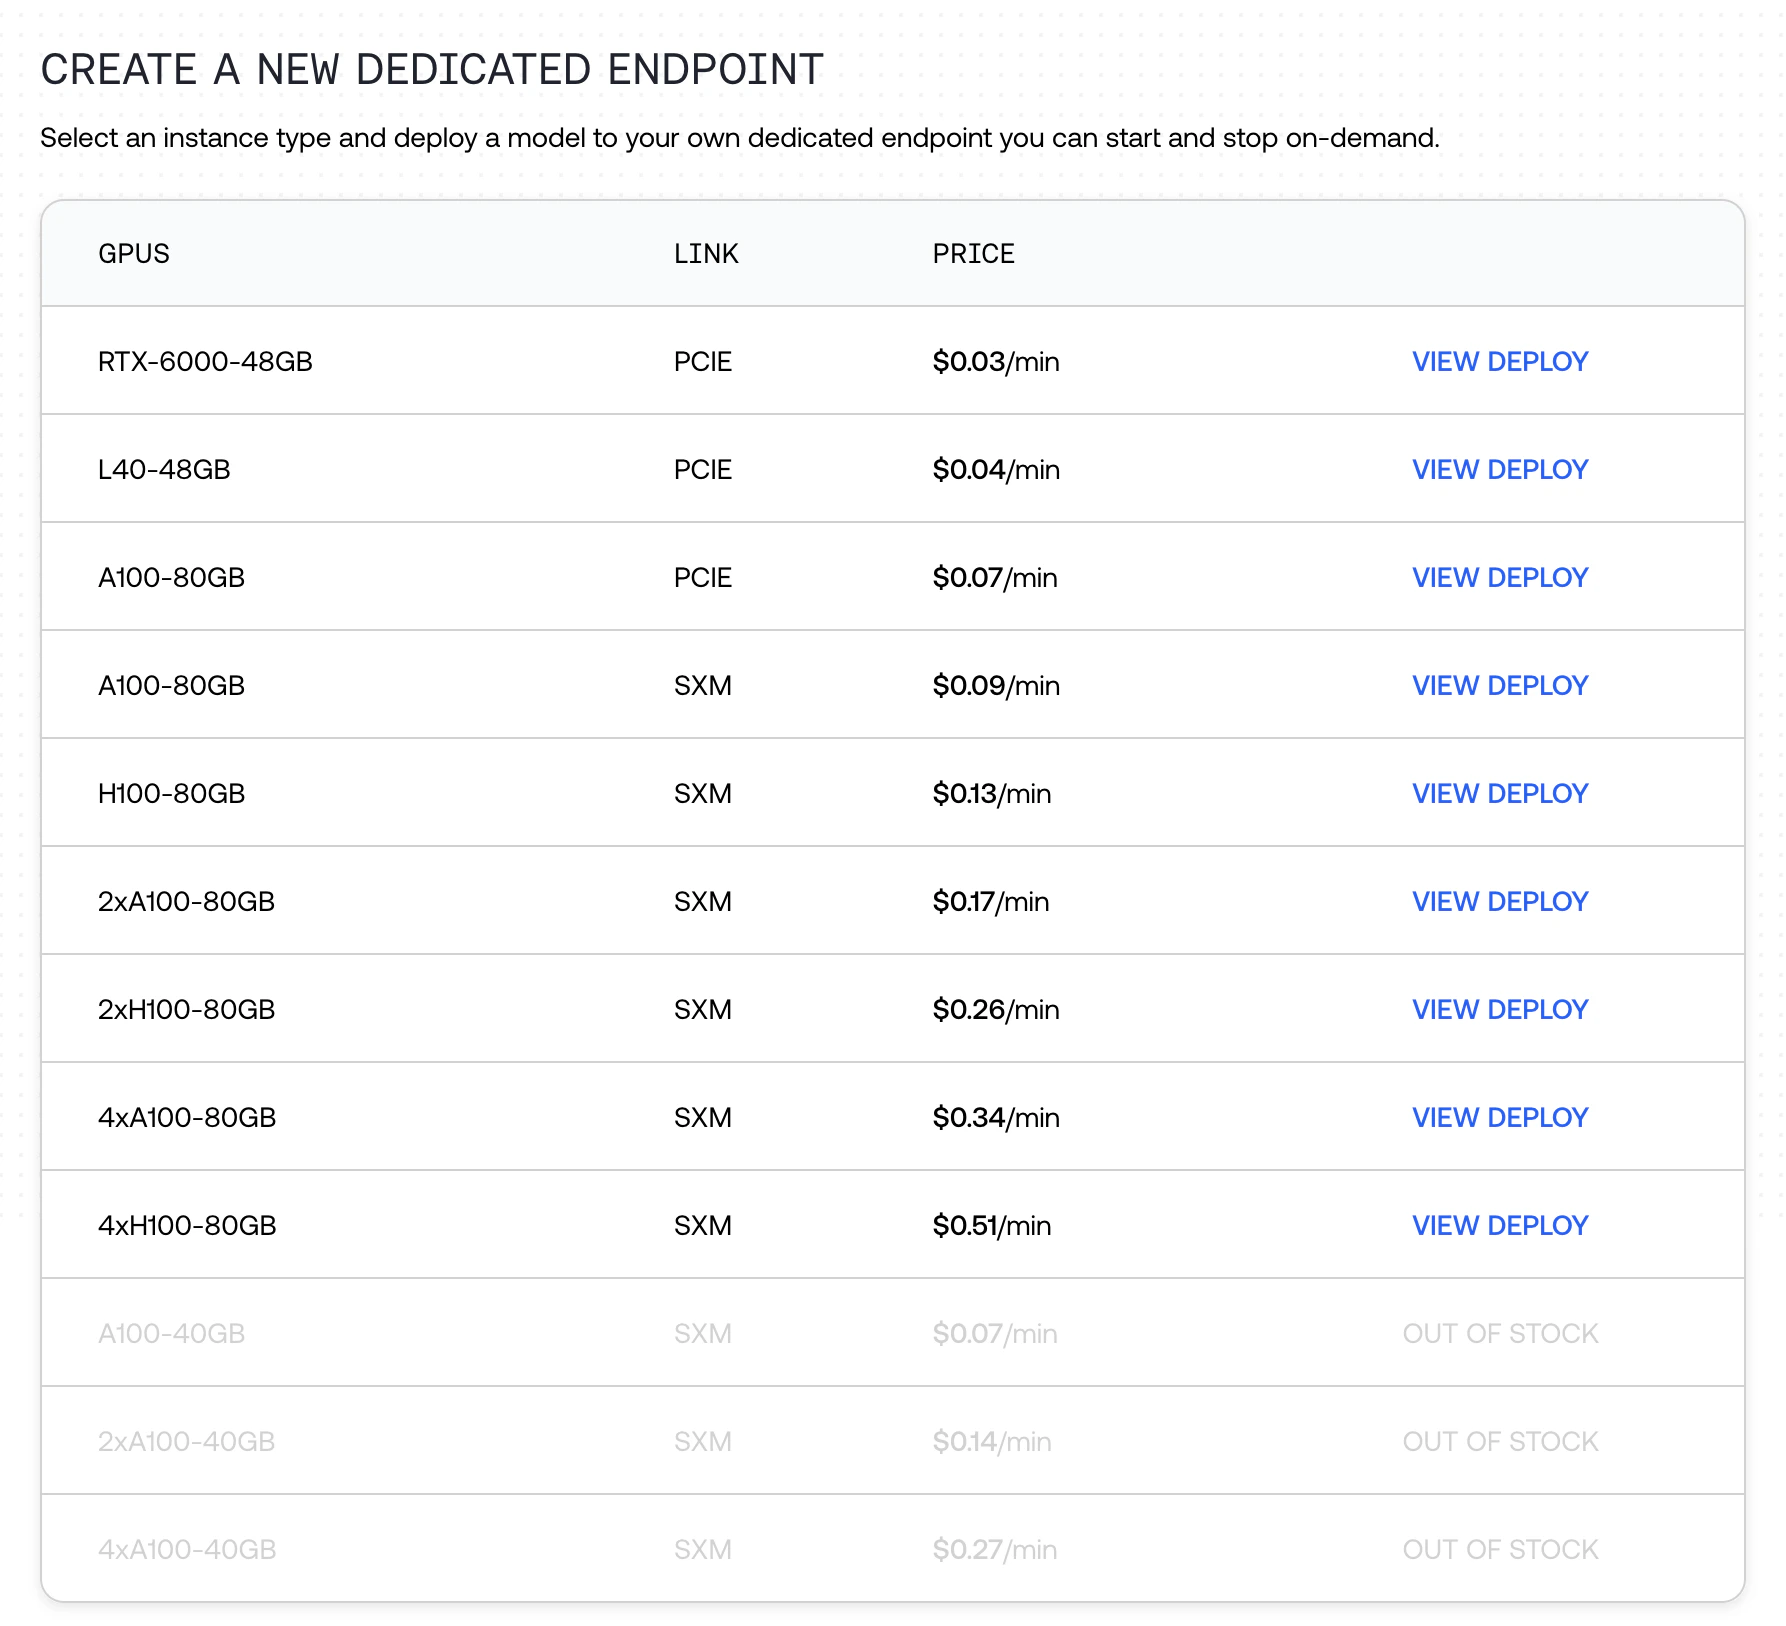 Available hardware includes RTX6000, L40, L40S, A100 PCIe, A100 SXM and H100. Hardware options displayed depend on model constraints and overall hardware availability.
If you click on a configuration you'll see more details, along with a Play button:
Available hardware includes RTX6000, L40, L40S, A100 PCIe, A100 SXM and H100. Hardware options displayed depend on model constraints and overall hardware availability.
If you click on a configuration you'll see more details, along with a Play button:
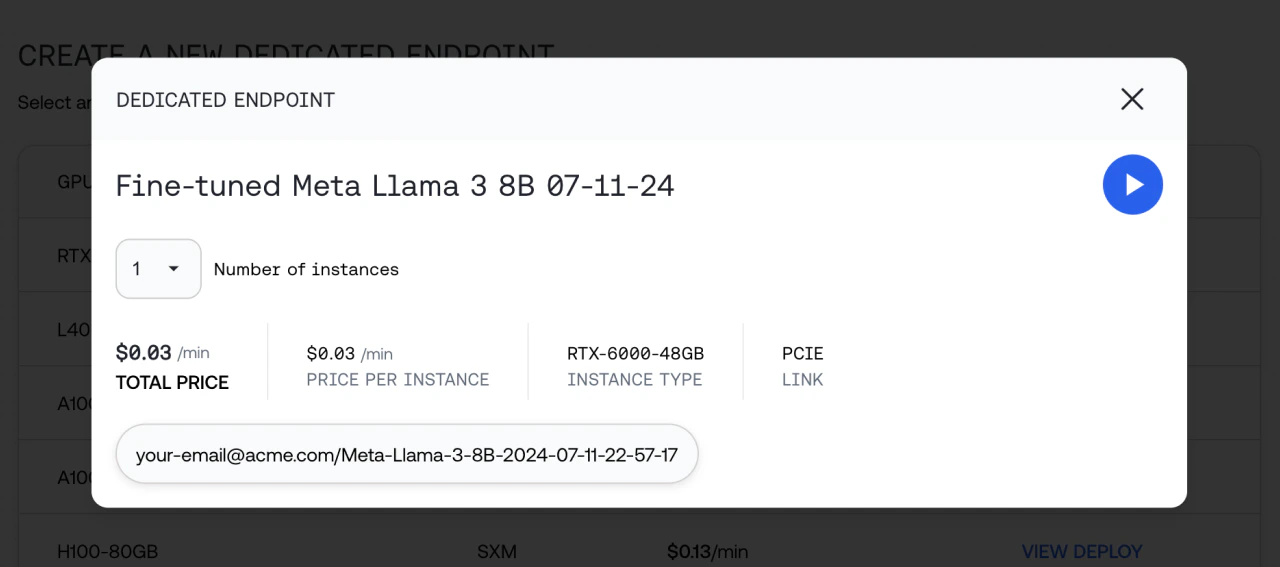 Click the Play button to deploy the model and see the progress while it spins up.
Once it's deployed, you can use the ID to query your new model using any of our APIs:
```sh CLI theme={null}
together chat.completions \
--model "your-email@acme.com/Meta-Llama-3-8B-2024-07-11-22-57-17" \
--message "user" "What are some fun things to do in New York?"
```
```py Python theme={null}
import os
from together import Together
client = Together(api_key=os.environ.get("TOGETHER_API_KEY"))
stream = client.chat.completions.create(
model="your-email@acme.com/Meta-Llama-3-8B-2024-07-11-22-57-17",
messages=[{"role": "user", "content": "What are some fun things to do in New York?"}],
stream=True,
)
for chunk in stream:
print(chunk.choices[0].delta.content or "", end="", flush=True)
```
```ts TypeScript theme={null}
import Together from 'together-ai';
const together = new Together({
apiKey: process.env['TOGETHER_API_KEY'],
});
const stream = await together.chat.completions.create({
model: 'your-email@acme.com/Meta-Llama-3-8B-2024-07-11-22-57-17',
messages: [
{ role: 'user', content: 'What are some fun things to do in New York?' },
],
stream: true,
});
for await (const chunk of stream) {
// use process.stdout.write instead of console.log to avoid newlines
process.stdout.write(chunk.choices[0]?.delta?.content || '');
}
```
Hosting your fine-tuned model is charged per minute hosted. You can see the hourly pricing for fine-tuned model inference in [the pricing table](https://www.together.ai/pricing).
When you're not using the model, be sure to stop the endpoint from the [the models dashboard](https://api.together.xyz/models).
### Running your model locally
To run your model locally, first download it by calling `download` with your job ID:
```sh CLI theme={null}
together fine-tuning download "ft-bb62e747-b8fc-49a3-985c-f32f7cc6bb04"
```
```py Python theme={null}
import os
from together import Together
client = Together(api_key=os.environ.get("TOGETHER_API_KEY"))
client.fine_tuning.download(
id="ft-bb62e747-b8fc-49a3-985c-f32f7cc6bb04",
output="my-model/model.tar.zst"
)
```
```ts TypeScript theme={null}
import Together from 'together-ai';
const client = new Together({
apiKey: process.env['TOGETHER_API_KEY'],
});
await client.fineTune.download({
ft_id: 'ft-bb62e747-b8fc-49a3-985c-f32f7cc6bb04',
output: 'my-model/model.tar.zst',
});
```
Your model will be downloaded to the location specified in `output` as a `tar.zst` file, which is an archive file format that uses the [ZStandard](https://github.com/facebook/zstd) algorithm. You'll need to install ZStandard to decompress your model.
On Macs, you can use Homebrew:
```sh Shell theme={null}
brew install zstd
cd my-model
zstd -d model.tar.zst
tar -xvf model.tar
cd ..
```
Once your archive is decompressed, you should see the following set of files:
```text theme={null}
tokenizer_config.json
special_tokens_map.json
pytorch_model.bin
generation_config.json
tokenizer.json
config.json
```
These can be used with various libraries and languages to run your model locally. [Transformers](https://pypi.org/project/transformers/) is a popular Python library for working with pretrained models, and using it with your new model looks like this:
```py Python theme={null}
from transformers import AutoTokenizer, AutoModelForCausalLM
import torch
device = torch.device("cuda" if torch.cuda.is_available() else "cpu")
tokenizer = AutoTokenizer.from_pretrained("./my-model")
model = AutoModelForCausalLM.from_pretrained(
"./my-model",
trust_remote_code=True,
).to(device)
input_context = "Space Robots are"
input_ids = tokenizer.encode(input_context, return_tensors="pt")
output = model.generate(input_ids.to(device), max_length=128, temperature=0.7).cpu()
output_text = tokenizer.decode(output[0], skip_special_tokens=True)
print(output_text)
```
```text theme={null}
Space Robots are a great way to get your kids interested in science. After all, they are the future!
```
If you see the output, your new model is working!
You now have a custom fine-tuned model that you can run completely locally, either on your own machine or on networked hardware of your choice.
## Pricing
Pricing for fine-tuning is based on model size, the number of training tokens, the number of validation tokens, the number of evaluations, and the number of epochs. In other words, the total number of tokens used in a job is `n_epochs * n_tokens_per_training_dataset + n_evals * n_tokens_per_validation_dataset`. You can estimate [fine-tuning pricing](https://together.ai/pricing) with our calculator. The exact pricing may differ from the estimate cost by \~\$1 as the exact number of trainable parameter is different for each model.
Currently LoRA and full fine-tuning have the same pricing.
The tokenization step is a part of the fine-tuning process on our API, and the exact number of tokens and the price of your job will be available after the tokenization step is done. You can find the information in [your jobs dashboard](https://api.together.xyz/jobs) or retrieve them by running `together fine-tuning retrieve $JOB_ID` in your CLI.
**Q: Is there a minimum price?** The minimum price for a fine-tuning job is \$5. For example, fine-tuning Llama-3-8B with 1B training tokens for 1 epoch and 1M validation tokens for 10 evaluations is \$369.7. If you fine-tune this model for 1M training tokens for 1 epoch only without a validation set, it is \$0.37 based on the rate, and the final price will be \$5.
**Q: What happens if I cancel my job?** The final price will be determined based on the amount of tokens used to train and validate your model up to the point of the cancellation. For example, if your fine-tuning job is using Llama-3-8B with a batch size of 8, and you cancelled the job after 1000 training steps the total number of tokens used for training is 8192 \[context length] x 8 \[batch size] x 1000 \[steps] = 65,536,000. If your validation set has 1M tokens and it's run 10 evaluation steps before the cancellation, you will need to add 10M tokens to the token count. This results in \$30.91 as you can check in the [pricing page](https://www.together.ai/pricing).
Click the Play button to deploy the model and see the progress while it spins up.
Once it's deployed, you can use the ID to query your new model using any of our APIs:
```sh CLI theme={null}
together chat.completions \
--model "your-email@acme.com/Meta-Llama-3-8B-2024-07-11-22-57-17" \
--message "user" "What are some fun things to do in New York?"
```
```py Python theme={null}
import os
from together import Together
client = Together(api_key=os.environ.get("TOGETHER_API_KEY"))
stream = client.chat.completions.create(
model="your-email@acme.com/Meta-Llama-3-8B-2024-07-11-22-57-17",
messages=[{"role": "user", "content": "What are some fun things to do in New York?"}],
stream=True,
)
for chunk in stream:
print(chunk.choices[0].delta.content or "", end="", flush=True)
```
```ts TypeScript theme={null}
import Together from 'together-ai';
const together = new Together({
apiKey: process.env['TOGETHER_API_KEY'],
});
const stream = await together.chat.completions.create({
model: 'your-email@acme.com/Meta-Llama-3-8B-2024-07-11-22-57-17',
messages: [
{ role: 'user', content: 'What are some fun things to do in New York?' },
],
stream: true,
});
for await (const chunk of stream) {
// use process.stdout.write instead of console.log to avoid newlines
process.stdout.write(chunk.choices[0]?.delta?.content || '');
}
```
Hosting your fine-tuned model is charged per minute hosted. You can see the hourly pricing for fine-tuned model inference in [the pricing table](https://www.together.ai/pricing).
When you're not using the model, be sure to stop the endpoint from the [the models dashboard](https://api.together.xyz/models).
### Running your model locally
To run your model locally, first download it by calling `download` with your job ID:
```sh CLI theme={null}
together fine-tuning download "ft-bb62e747-b8fc-49a3-985c-f32f7cc6bb04"
```
```py Python theme={null}
import os
from together import Together
client = Together(api_key=os.environ.get("TOGETHER_API_KEY"))
client.fine_tuning.download(
id="ft-bb62e747-b8fc-49a3-985c-f32f7cc6bb04",
output="my-model/model.tar.zst"
)
```
```ts TypeScript theme={null}
import Together from 'together-ai';
const client = new Together({
apiKey: process.env['TOGETHER_API_KEY'],
});
await client.fineTune.download({
ft_id: 'ft-bb62e747-b8fc-49a3-985c-f32f7cc6bb04',
output: 'my-model/model.tar.zst',
});
```
Your model will be downloaded to the location specified in `output` as a `tar.zst` file, which is an archive file format that uses the [ZStandard](https://github.com/facebook/zstd) algorithm. You'll need to install ZStandard to decompress your model.
On Macs, you can use Homebrew:
```sh Shell theme={null}
brew install zstd
cd my-model
zstd -d model.tar.zst
tar -xvf model.tar
cd ..
```
Once your archive is decompressed, you should see the following set of files:
```text theme={null}
tokenizer_config.json
special_tokens_map.json
pytorch_model.bin
generation_config.json
tokenizer.json
config.json
```
These can be used with various libraries and languages to run your model locally. [Transformers](https://pypi.org/project/transformers/) is a popular Python library for working with pretrained models, and using it with your new model looks like this:
```py Python theme={null}
from transformers import AutoTokenizer, AutoModelForCausalLM
import torch
device = torch.device("cuda" if torch.cuda.is_available() else "cpu")
tokenizer = AutoTokenizer.from_pretrained("./my-model")
model = AutoModelForCausalLM.from_pretrained(
"./my-model",
trust_remote_code=True,
).to(device)
input_context = "Space Robots are"
input_ids = tokenizer.encode(input_context, return_tensors="pt")
output = model.generate(input_ids.to(device), max_length=128, temperature=0.7).cpu()
output_text = tokenizer.decode(output[0], skip_special_tokens=True)
print(output_text)
```
```text theme={null}
Space Robots are a great way to get your kids interested in science. After all, they are the future!
```
If you see the output, your new model is working!
You now have a custom fine-tuned model that you can run completely locally, either on your own machine or on networked hardware of your choice.
## Pricing
Pricing for fine-tuning is based on model size, the number of training tokens, the number of validation tokens, the number of evaluations, and the number of epochs. In other words, the total number of tokens used in a job is `n_epochs * n_tokens_per_training_dataset + n_evals * n_tokens_per_validation_dataset`. You can estimate [fine-tuning pricing](https://together.ai/pricing) with our calculator. The exact pricing may differ from the estimate cost by \~\$1 as the exact number of trainable parameter is different for each model.
Currently LoRA and full fine-tuning have the same pricing.
The tokenization step is a part of the fine-tuning process on our API, and the exact number of tokens and the price of your job will be available after the tokenization step is done. You can find the information in [your jobs dashboard](https://api.together.xyz/jobs) or retrieve them by running `together fine-tuning retrieve $JOB_ID` in your CLI.
**Q: Is there a minimum price?** The minimum price for a fine-tuning job is \$5. For example, fine-tuning Llama-3-8B with 1B training tokens for 1 epoch and 1M validation tokens for 10 evaluations is \$369.7. If you fine-tune this model for 1M training tokens for 1 epoch only without a validation set, it is \$0.37 based on the rate, and the final price will be \$5.
**Q: What happens if I cancel my job?** The final price will be determined based on the amount of tokens used to train and validate your model up to the point of the cancellation. For example, if your fine-tuning job is using Llama-3-8B with a batch size of 8, and you cancelled the job after 1000 training steps the total number of tokens used for training is 8192 \[context length] x 8 \[batch size] x 1000 \[steps] = 65,536,000. If your validation set has 1M tokens and it's run 10 evaluation steps before the cancellation, you will need to add 10M tokens to the token count. This results in \$30.91 as you can check in the [pricing page](https://www.together.ai/pricing).