Large Language Models (LLMs) offer powerful general capabilities, but often require fine-tuning to excel at specific tasks or understand domain-specific language. Fine-tuning adapts a trained model to a smaller, targeted dataset, enhancing its performance for your unique needs.This guide provides a step-by-step walkthrough for fine-tuning models using the Together AI platform. We will cover everything from preparing your data to evaluating your fine-tuned model.We will cover:
Dataset Preparation: Loading a standard dataset, transforming it into the required format for supervised fine-tuning on Together AI, and uploading your formatted dataset to Together AI Files.
Fine-tuning Job Launch: Configuring and initiating a fine-tuning job using the Together AI API.
Job Monitoring: Checking the status and progress of your fine-tuning job.
Inference: Using your newly fine-tuned model via the Together AI API for predictions.
Evaluation: Comparing the performance of the fine-tuned model against the base model on a test set.
By following this guide, you’ll gain practical experience in creating specialized LLMs tailored to your specific requirements using Together AI.
Fine-tuning is the process of improving an existing LLM for a specific task or domain. You can enhance an LLM by providing labeled examples for a particular task which it can learn from. These examples can come from public datasets or private data specific to your organization.Together AI facilitates every step of the fine-tuning process, from data preparation to model deployment. Together supports two types of fine-tuning:
LoRA (Low-Rank Adaptation) fine-tuning: Fine-tunes only a small subset of weights compared to full fine-tuning. This is faster, requires less computational resources, and is recommended for most use cases. Our fine-tuning API defaults to LoRA.
Full fine-tuning: Updates all weights in the model, which requires more computational resources but may provide better results for certain tasks.
Fine-tuning requires data formatted in a specific way. We’ll use a conversational dataset as an example - here the goal is to improve the model on multi-turn conversations.Data FormatsTogether AI supports several data formats:
Conversational data: A JSON object per line, where each object contains a list of conversation turns under the "messages" key. Each message must have a "role" (system, user, or assistant) and "content". See details here.
{"messages": [{"role": "system", "content": "You are a helpful assistant."},
              {"role": "user", "content": "Hello!"},
              {"role": "assistant", "content": "Hi! How can I help you?"}]}
Instruction data: For instruction-based tasks with prompt-completion pairs. See details here.
Preference data: For preference-based fine-tuning. See details here.
Generic text data: For simple text completion tasks. See details here.
File FormatsTogether AI supports two file formats:
JSONL: Simpler and works for most cases.
Parquet: Stores pre-tokenized data, provides flexibility to specify custom attention mask and labels (loss masking).
By default, it’s easier to use JSONL. However, Parquet can be useful if you need custom tokenization or specific loss masking.Example: Preparing the CoQA DatasetHere’s an example of transforming the CoQA dataset into the required chat format:
from datasets import load_dataset# Load the datasetcoqa_dataset = load_dataset("stanfordnlp/coqa")# The system prompt, if present, must always be at the beginningsystem_prompt = "Read the story and extract answers for the questions.\nStory: {}"def map_fields(row): # Create system prompt messages = [{"role": "system", "content": system_prompt.format(row["story"])}] # Add user and assistant messages for q, a in zip(row["questions"], row["answers"]["input_text"]): messages.append({"role": "user", "content": q}) messages.append({"role": "assistant", "content": a}) return {"messages": messages}# Transform the data using the mapping functiontrain_messages = coqa_dataset["train"].map(map_fields, remove_columns=coqa_dataset["train"].column_names)# Save to data to JSON filetrain_messages.to_json("coqa_prepared_train.jsonl")
Loss MaskingIn some cases, you may want to fine-tune a model to focus on predicting only a specific part of the prompt:
When using Conversational or Instruction Data Formats, you can specify train_on_inputs (bool or ‘auto’) - whether to mask the user messages in conversational data or prompts in instruction data.
For Conversational format, you can mask specific messages by assigning weights.
With pre-tokenized datasets (Parquet), you can provide custom labels to mask specific tokens by setting their label to -100.
Checking and Uploading Your DataOnce your data is prepared, verify it’s correctly formatted and upload it to Together AI:
# Using Pythonfrom together import Togetherimport osimport jsonTOGETHER_API_KEY = os.getenv("TOGETHER_API_KEY")WANDB_API_KEY = os.getenv("WANDB_API_KEY") # Optional, for logging fine-tuning to wandb# Check the file formatfrom together.utils import check_fileclient = Together(api_key=TOGETHER_API_KEY)sft_report = check_file("coqa_prepared_train.jsonl")print(json.dumps(sft_report, indent=2))assert sft_report["is_check_passed"] == True# Upload the data to Togethertrain_file_resp = client.files.upload("coqa_prepared_train.jsonl", check=True)print(train_file_resp.id) # Save this ID for starting your fine-tuning job
The output from checking the file should look similar to:
With our data uploaded, we can now launch the fine-tuning job using client.fine_tuning.create().Key Parameters
model: The base model you want to fine-tune (e.g., 'meta-llama/Meta-Llama-3.1-8B-Instruct-Reference')
training_file: The ID of your uploaded training JSONL file
validation_file: Optional ID of validation file (highly recommended for monitoring)
suffix: A custom string added to create your unique model name (e.g., 'test1_8b')
n_epochs: Number of times the model sees the entire dataset
n_checkpoints: Number of checkpoints to save during training (for resuming or selecting the best model)
learning_rate: Controls how much model weights are updated
batch_size: Number of examples processed per iteration (default: “max”)
lora: Set to True for LoRA fine-tuning
train_on_inputs: Whether to mask user messages or prompts (can be bool or ‘auto’)
warmup_ratio: Ratio of steps for warmup
For an exhaustive list of all the available fine-tuning parameters refer to the Together AI Fine-tuning API Reference docs.LoRA Fine-tuning (Recommended)
# Using Python - This fine-tuning job should take ~10-15 minutes to completeft_resp = client.fine_tuning.create( training_file = train_file_resp.id, model = 'meta-llama/Meta-Llama-3.1-8B-Instruct-Reference', train_on_inputs = "auto", n_epochs = 3, n_checkpoints = 1, wandb_api_key = WANDB_API_KEY, # Optional, for visualization lora = True, # Default True warmup_ratio = 0, learning_rate = 1e-5, suffix = 'test1_8b',)print(ft_resp.id) # Save this job ID for monitoring
Full Fine-tuningFor full fine-tuning, simply omit the lora parameter:
# Using Pythonft_resp = client.fine_tuning.create( training_file = train_file_resp.id, model = 'meta-llama/Meta-Llama-3.1-8B-Instruct-Reference', train_on_inputs = "auto", n_epochs = 3, n_checkpoints = 1, warmup_ratio = 0, lora = False, # Must be specified as False, defaults to True learning_rate = 1e-5, suffix = 'test1_8b_full_finetune',)
The response will include your job ID, which you’ll use to monitor progress:
Fine-tuning can take time depending on the model size, dataset size, and hyperparameters. Your job will progress through several states: Pending, Queued, Running, Uploading, and Completed.You can monitor and manage the job’s progress using the following methods:
List all jobs: client.fine_tuning.list()
Status of a job: client.fine_tuning.retrieve(id=ft_resp.id)
List all events for a job: client.fine_tuning.list_events(id=ft_resp.id) - Retrieves logs and events generated during the job
Once the job is complete (status == 'completed'), the response from retrieve will contain the name of your newly created fine-tuned model. It follows the pattern: <your-account>/<base-model-name>:<suffix>:<job-id>.Check Status via API
# Check status of the jobresp = client.fine_tuning.retrieve(ft_resp.id)print(resp.status)# This loop will print the logs of the job thus farfor event in client.fine_tuning.list_events(id=ft_resp.id).data: print(event.message)
Example output:
Fine tune request createdJob started at Thu Apr 3 03:19:46 UTC 2025Model data downloaded for togethercomputer/Meta-Llama-3.1-8B-Instruct-Reference__TOG__FT at Thu Apr 3 03:19:48 UTC 2025Data downloaded for togethercomputer/Meta-Llama-3.1-8B-Instruct-Reference__TOG__FT at $2025-04-03T03:19:55.595750WandB run initialized.Training started for model togethercomputer/Meta-Llama-3.1-8B-Instruct-Reference__TOG__FTEpoch completed, at step 24Epoch completed, at step 48Epoch completed, at step 72Training completed for togethercomputer/Meta-Llama-3.1-8B-Instruct-Reference__TOG__FT at Thu Apr 3 03:27:55 UTC 2025Uploading output modelCompressing output modelModel compression completeModel upload completeJob finished at Thu Apr 3 03:31:33 UTC 2025
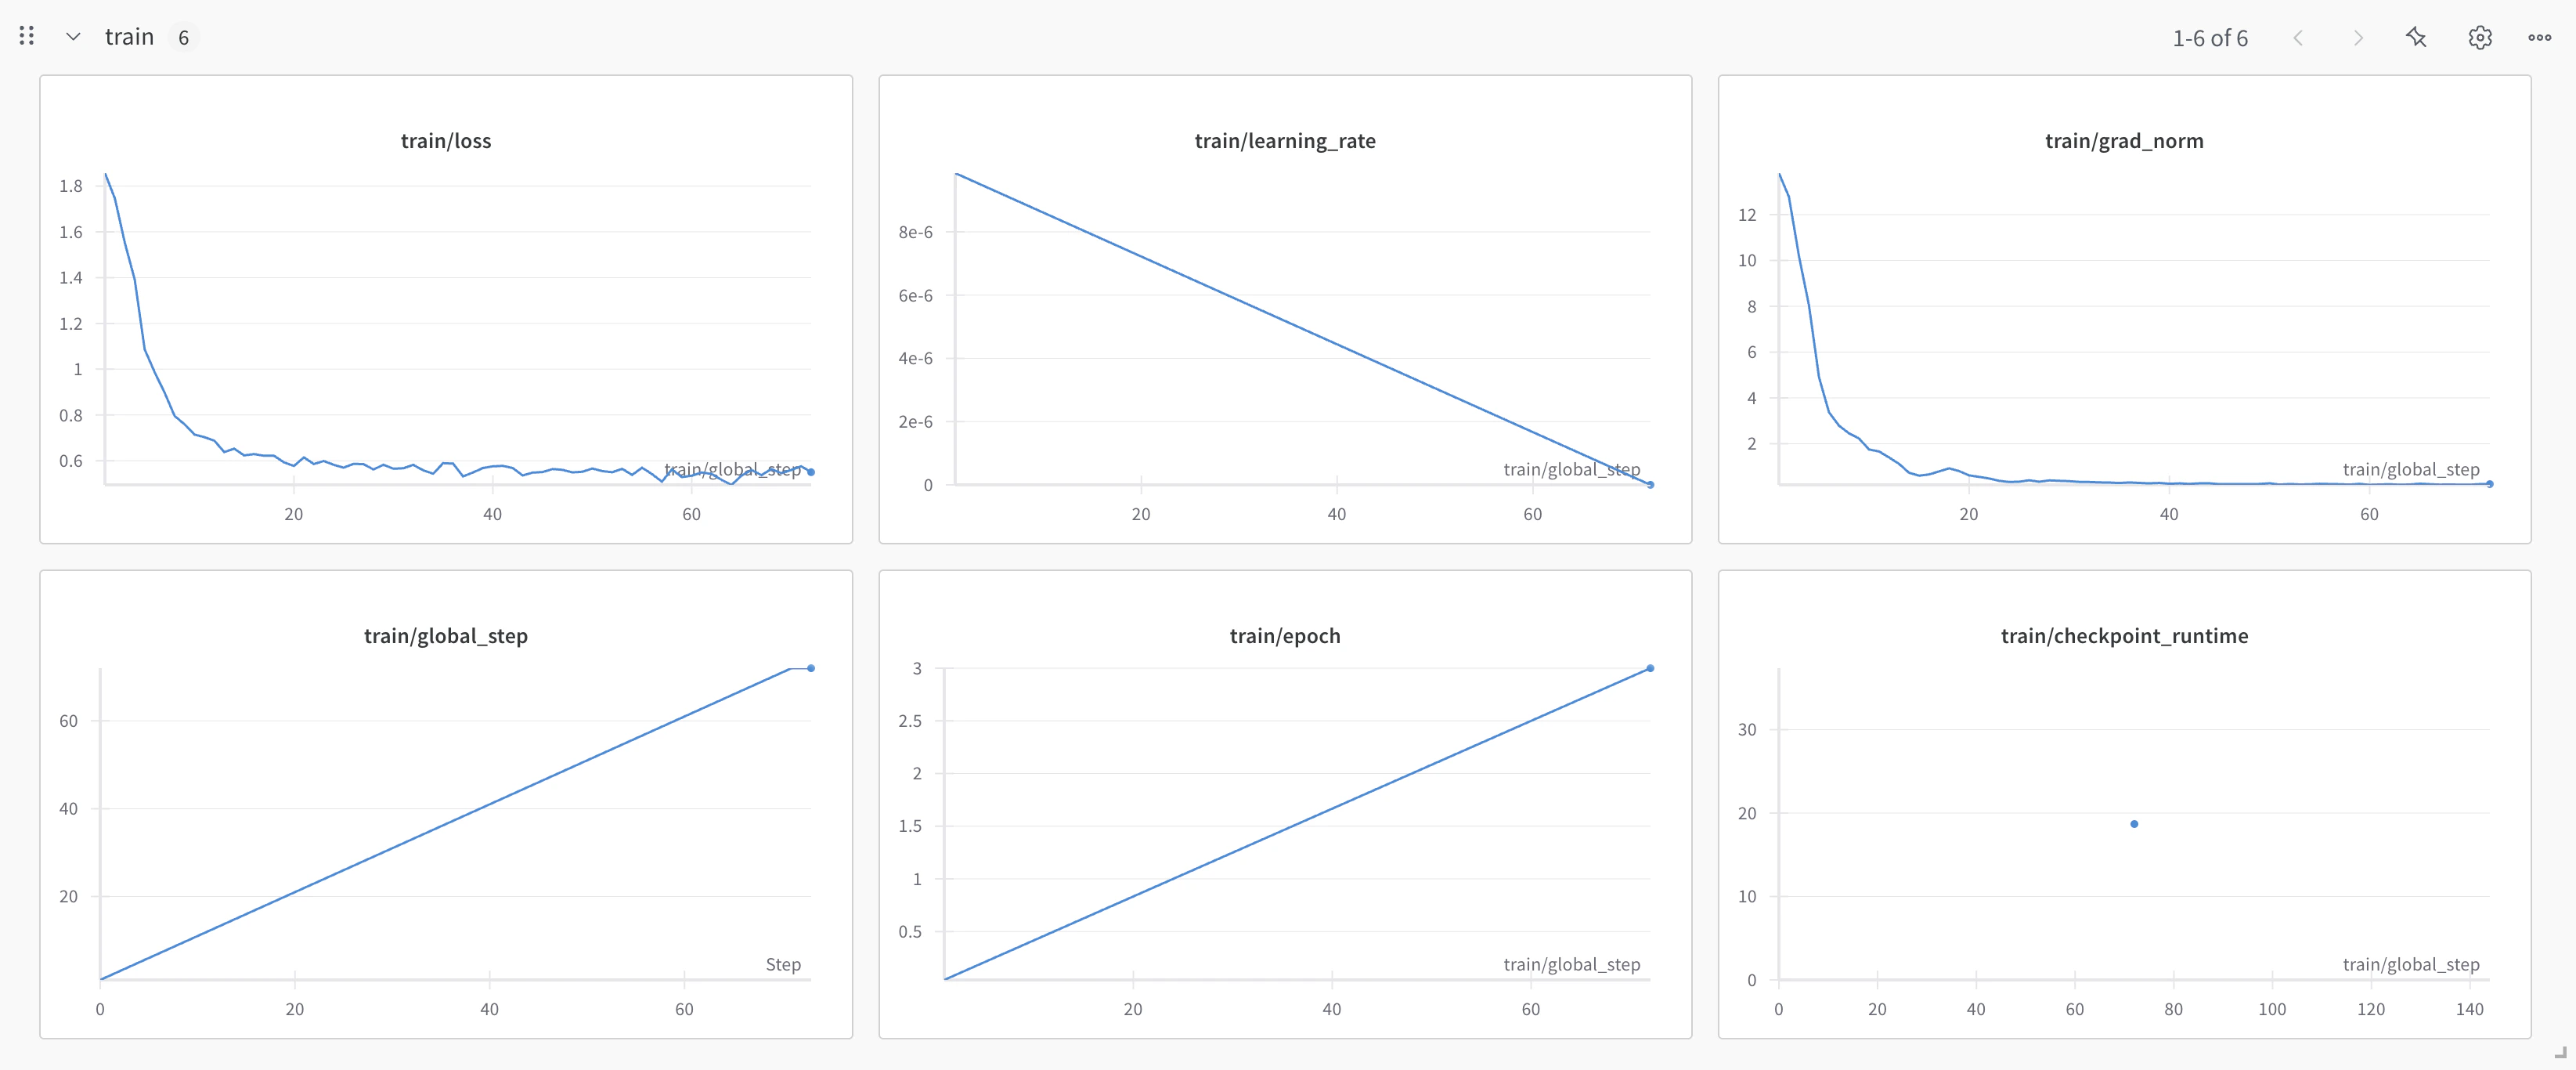
Dashboard MonitoringYou can also monitor your job on the Together AI jobs dashboard.If you provided a Weights & Biases API key, you can view detailed training metrics on the W&B platform, including loss curves and more.
Once your fine-tuning job completes, your model will be available for use:Option 1: Serverless LoRA InferenceIf you used LoRA fine-tuning and the model supports serverless LoRA inference, you can immediately use your model without deployment. We can call it just like any other model on the Together AI platform, by providing the unique fine-tuned model output_name from our fine-tuning job. See the list of all models that support LoRA Inference.
# The first time you run this it'll take longer to load the adapter weights for the first timefinetuned_model = ft_resp.output_name # From your fine-tuning job responseuser_prompt = "What is the capital of France?"response = client.chat.completions.create( model = finetuned_model, messages=[ { "role": "user", "content": user_prompt, } ], max_tokens=124,)print(response.choices[0].message.content)
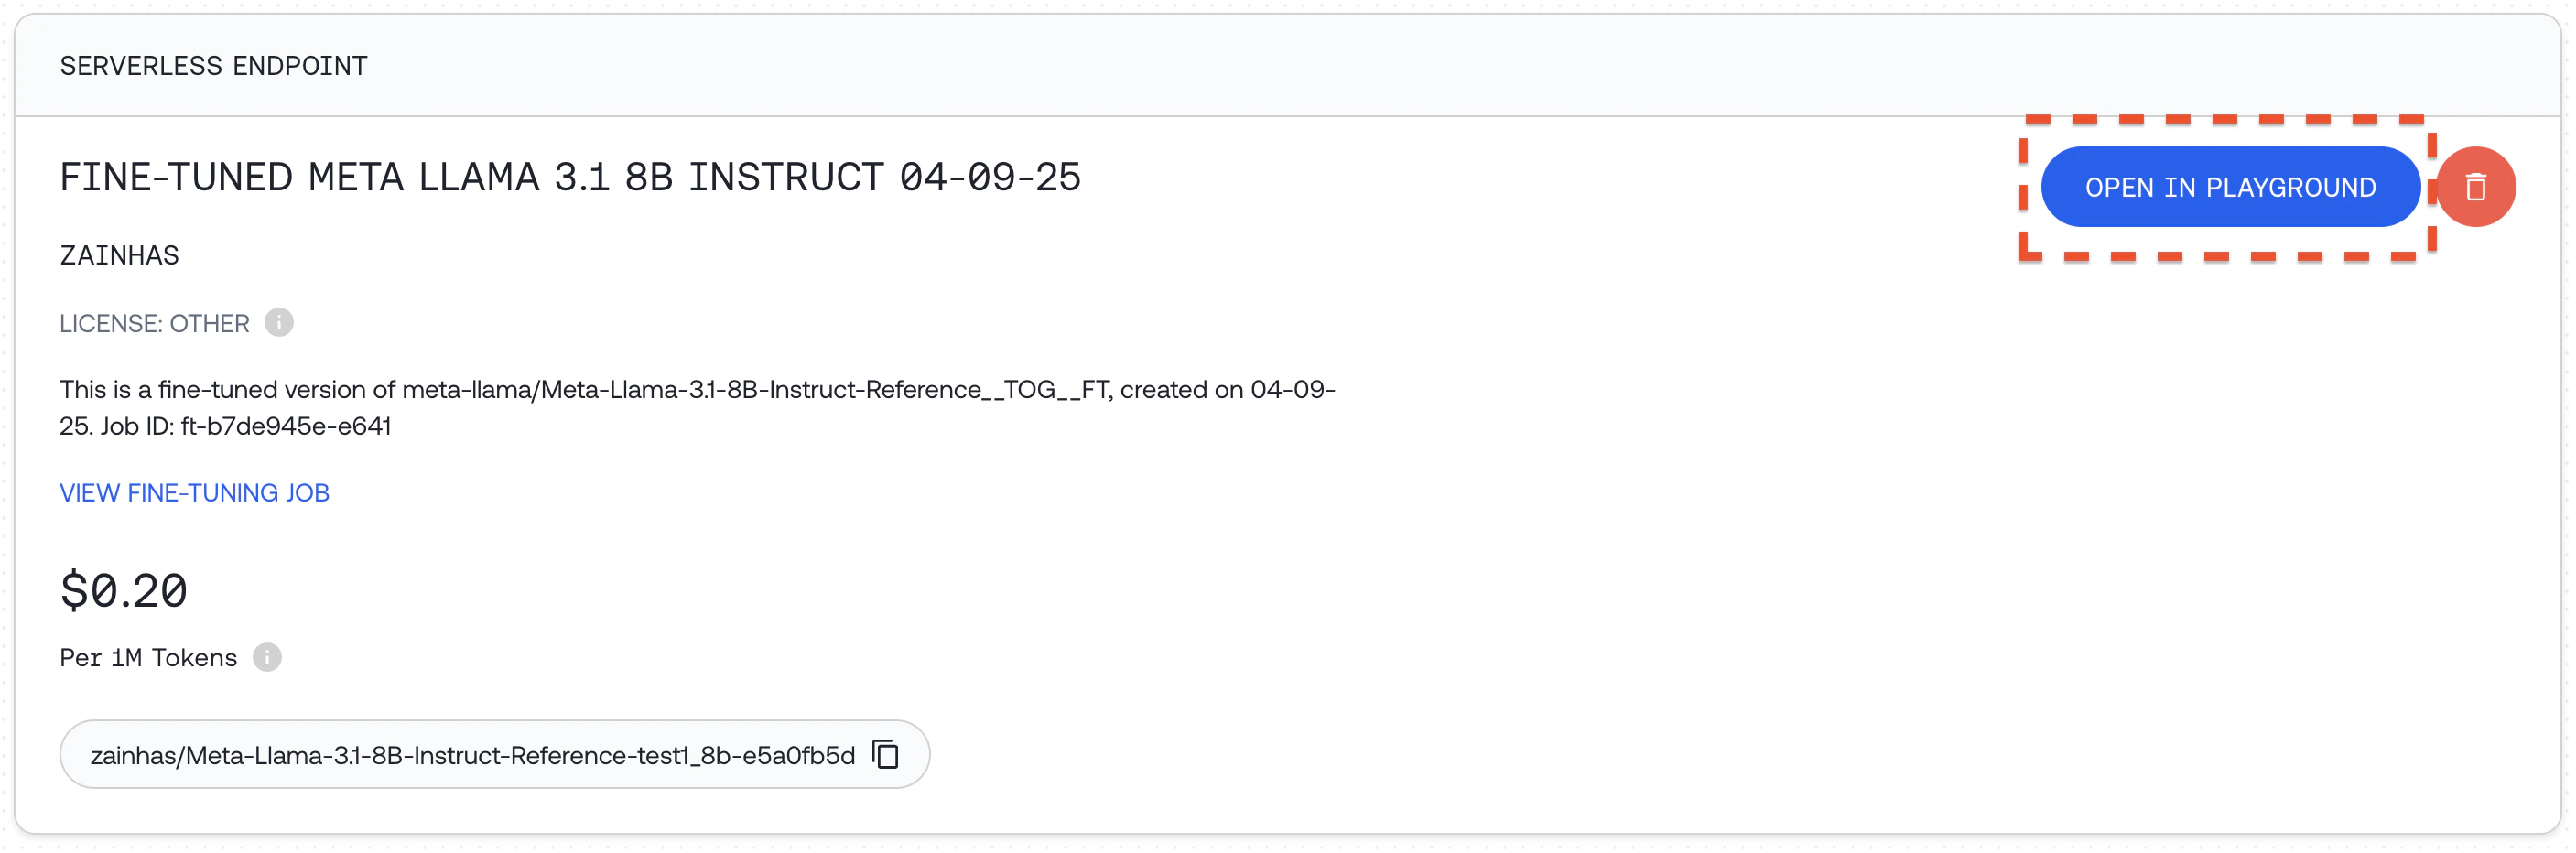
You can also prompt the model in the Together AI playground by going to your models dashboard and clicking "OPEN IN PLAYGROUND". Read more about Serverless LoRA Inference here
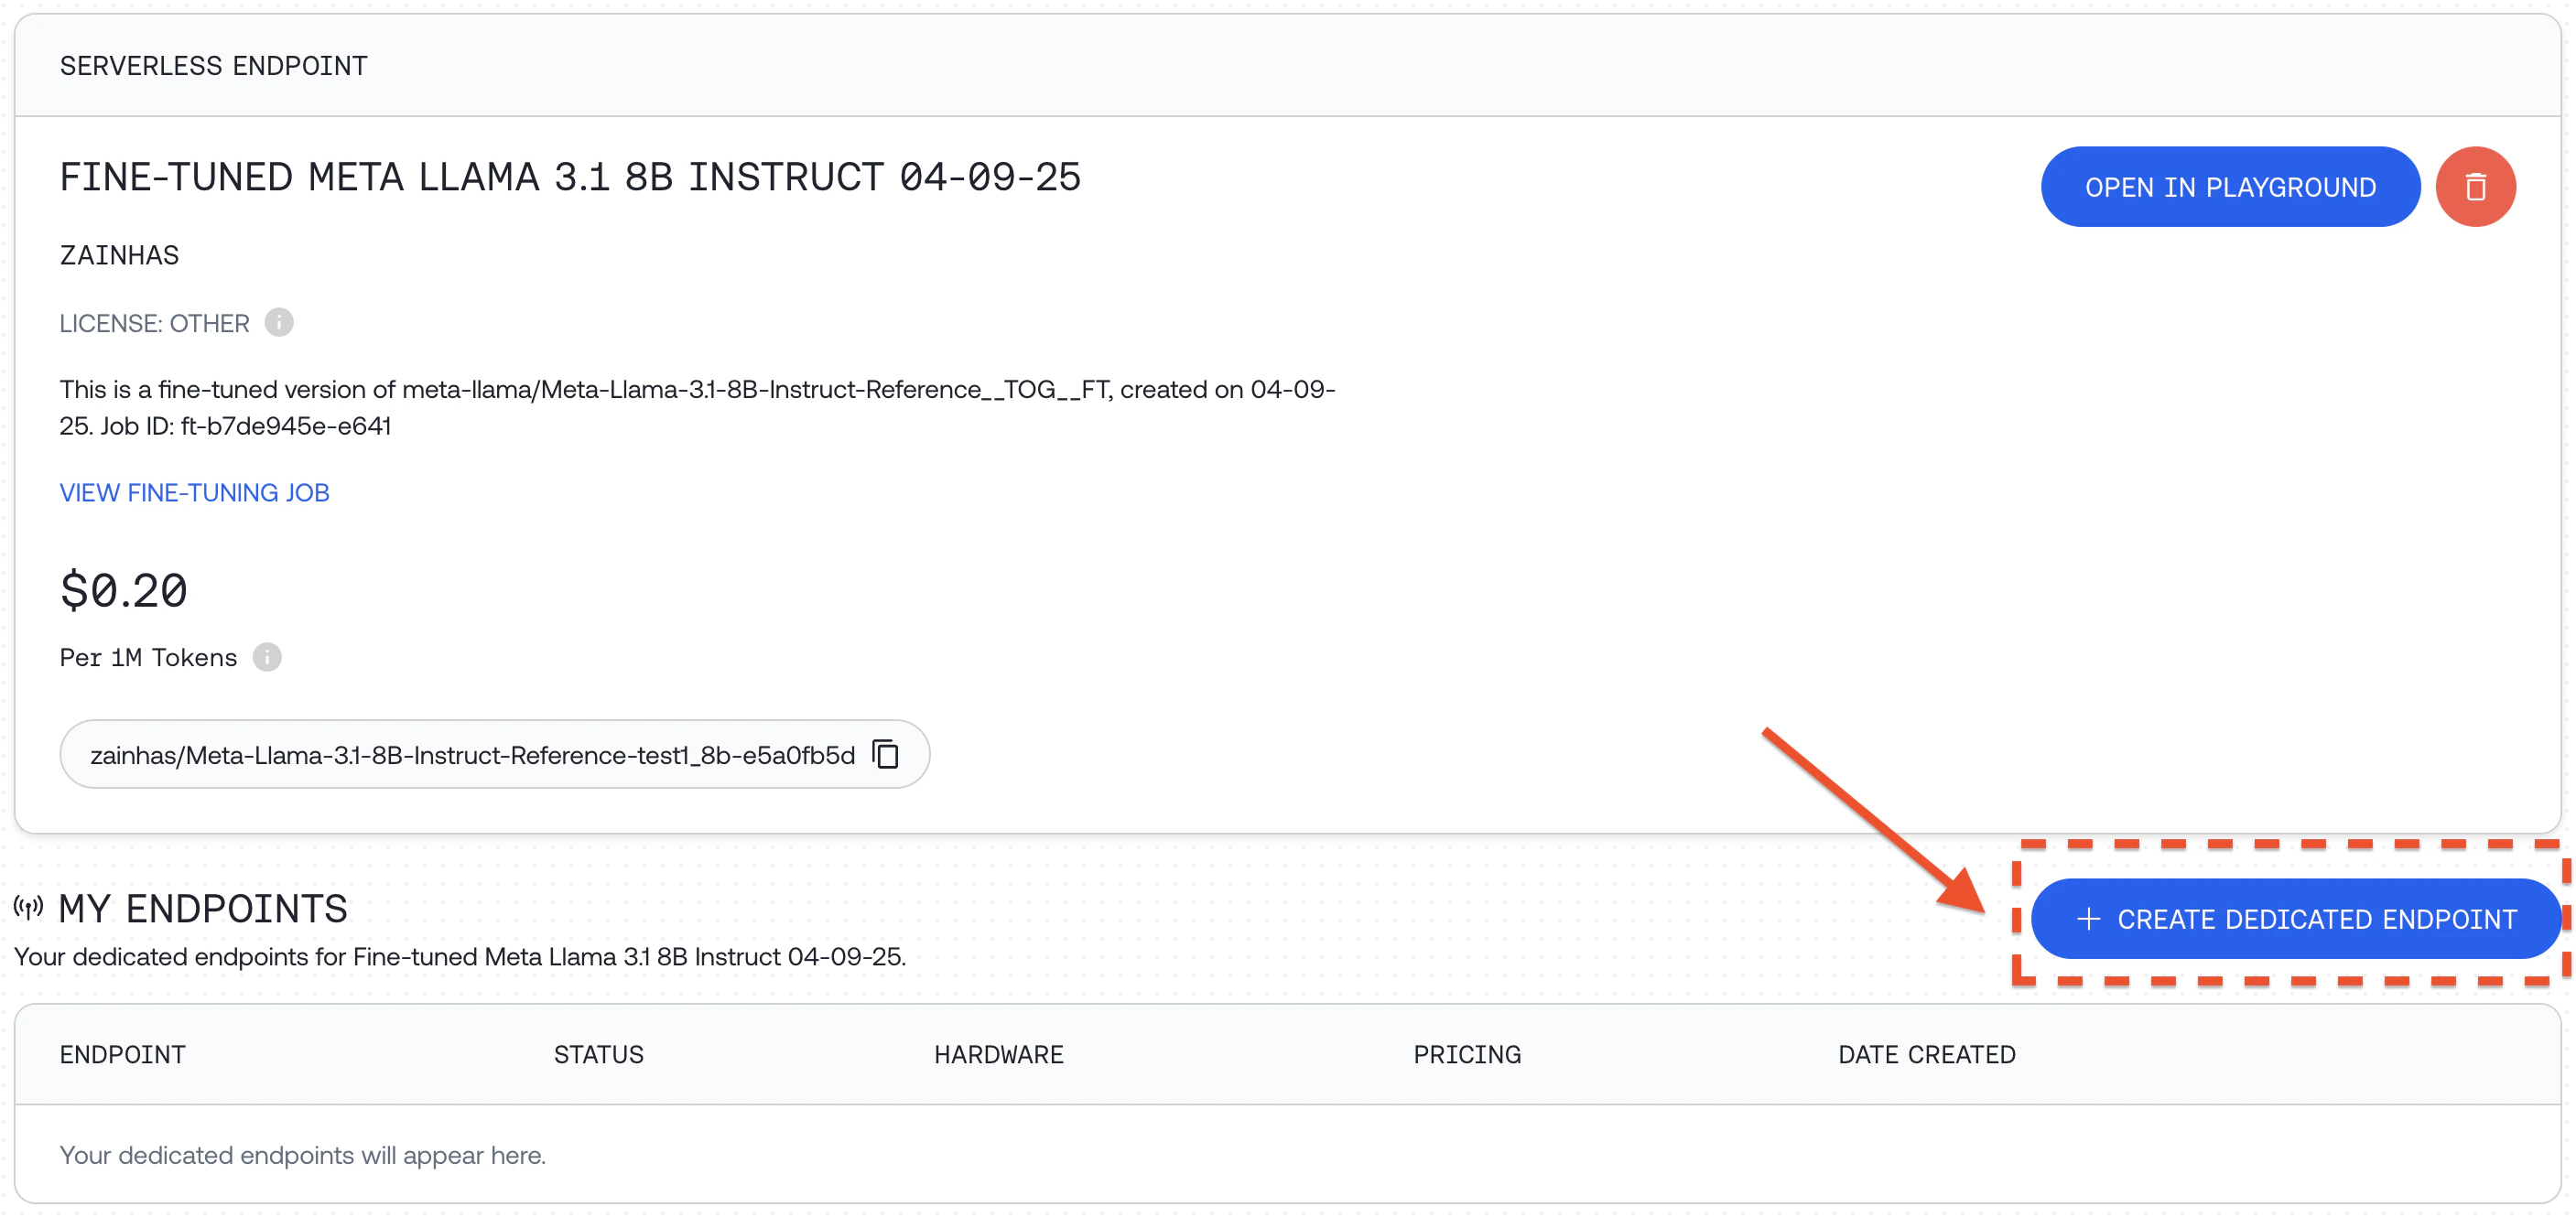
Option 2: Deploy a Dedicated EndpointAnother way to run your fine-tuned model is to deploy it on a custom dedicated endpoint:
Click "+ CREATE DEDICATED ENDPOINT" for your fine-tuned model
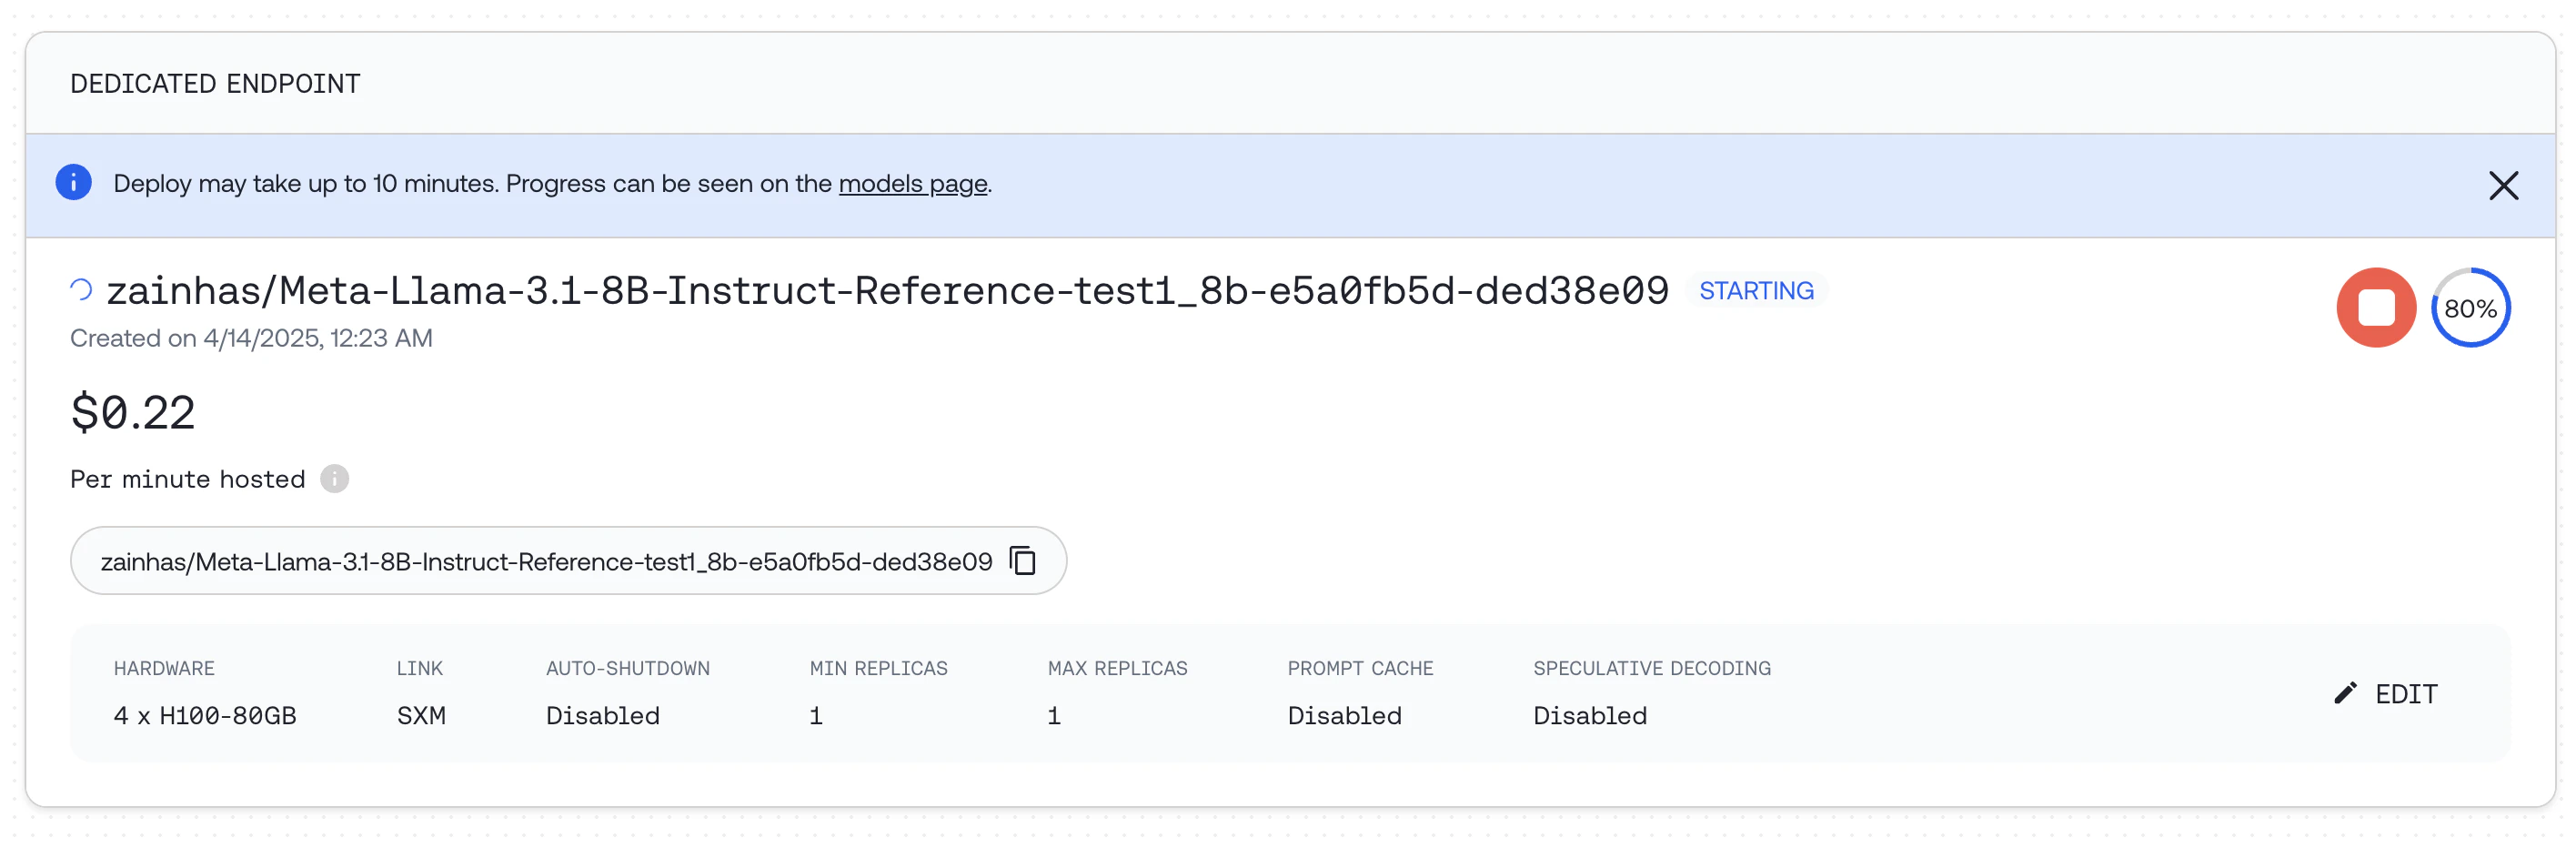
Select hardware configuration and scaling options, including min and max replicas which affects the maximum QPS the deployment can support and then click "DEPLOY"
If you run this code it will deploy a dedicated endpoint for you. For detailed documentation around how to deploy, delete and modify endpoints see the Endpoints API Reference.
Once deployed, you can query the endpoint:
response = client.chat.completions.create( model="zainhas/Meta-Llama-3.1-8B-Instruct-Reference-test1_8b-e5a0fb5d-ded38e09", messages=[{ "role": "user", "content": "What is the capital of France?" }], max_tokens=128,)print(response.choices[0].message.content)
To assess the impact of fine-tuning, we can compare the responses of our fine-tuned model with the original base model on the same prompts in our test set. This provides a way to measure improvements after fine-tuning.Using a Validation Set During TrainingYou can provide a validation set when starting your fine-tuning job:
response = client.fine_tuning.create( training_file = 'your-training-file-id', validation_file = 'your-validation-file-id', n_evals = 10, # Number of times to evaluate on validation set model = 'meta-llama/Meta-Llama-3.1-8B-Instruct-Reference',)
Post-Training Evaluation ExampleHere’s a comprehensive example of evaluating models after fine-tuning, using the CoQA dataset:
Define a function to generate answers from both models:
from tqdm.auto import tqdmfrom multiprocessing.pool import ThreadPoolbase_model = "meta-llama/Meta-Llama-3.1-8B-Instruct-Turbo" # Original modelfinetuned_model = ft_resp.output_name # Fine-tuned modeldef get_model_answers(model_name): """ Generate model answers for a given model name using a dataset of questions and answers. Args: model_name (str): The name of the model to use for generating answers. Returns: list: A list of lists, where each inner list contains the answers generated by the model. """ model_answers = [] system_prompt = "Read the story and extract answers for the questions.\nStory: {}" def get_answers(data): answers = [] messages = [ { "role": "system", "content": system_prompt.format(data["story"]), } ] for q, true_answer in zip(data["questions"], data["answers"]["input_text"]): try: messages.append( { "role": "user", "content": q } ) response = client.chat.completions.create( messages=messages, model=model_name, max_tokens=64 ) answer = response.choices[0].message.content answers.append(answer) except Exception: answers.append("Invalid Response") return answers # We'll use 8 threads to generate answers faster in parallel with ThreadPool(8) as pool: for answers in tqdm(pool.imap(get_answers, coqa_dataset_validation), total=len(coqa_dataset_validation)): model_answers.append(answers) return model_answers
Define a function to calculate evaluation metrics:
import transformers.data.metrics.squad_metrics as squad_metricsdef get_metrics(pred_answers): """ Calculate the Exact Match (EM) and F1 metrics for predicted answers. Args: pred_answers (list): A list of predicted answers. Returns: tuple: A tuple containing EM score and F1 score. """ em_metrics = [] f1_metrics = [] for pred, data in tqdm(zip(pred_answers, coqa_dataset_validation), total=len(pred_answers)): for pred_answer, true_answer in zip(pred, data["answers"]["input_text"]): em_metrics.append(squad_metrics.compute_exact(true_answer, pred_answer)) f1_metrics.append(squad_metrics.compute_f1(true_answer, pred_answer)) return sum(em_metrics) / len(em_metrics), sum(f1_metrics) / len(f1_metrics)
Calculate and compare metrics:
# Calculate metrics for both modelsem_base, f1_base = get_metrics(base_answers)em_ft, f1_ft = get_metrics(finetuned_answers)print(f"Base Model - EM: {em_base:.2f}, F1: {f1_base:.2f}")print(f"Fine-tuned Model - EM: {em_ft:.2f}, F1: {f1_ft:.2f}")
You should get figures similar to the table below:
Llama 3.1 8B
EM
F1
Original
0.01
0.18
Fine-tuned
0.32
0.41
We can see that the fine-tuned model performs significantly better on the test set, with a large improvement in both Exact Match and F1 scores.
A specific checkpoint step with the format ft-...:{STEP_NUM}
To check all available checkpoints for a job, use:
together fine-tuning list-checkpoints {FT_JOB_ID}
Training and Validation SplitTo split your dataset into training and validation sets:
split_ratio=0.9 # Specify the split ratio for your training settotal_lines=$(wc -l < "your-datafile.jsonl")split_lines=$((total_lines * split_ratio))head -n $split_lines "your-datafile.jsonl" > "your-datafile-train.jsonl"tail -n +$((split_lines + 1)) "your-datafile.jsonl" > "your-datafile-validation.jsonl"
Using a Validation Set During TrainingA validation set is a held-out dataset to evaluate your model performance during training on unseen data. Using a validation set provides multiple benefits such as monitoring for overfitting and helping with hyperparameter tuning.To use a validation set, provide validation_file and set n_evals to a number above 0:
response = client.fine_tuning.create( training_file = 'your-training-file-id', validation_file = 'your-validation-file-id', n_evals = 10, # Number of evaluations over the entire job model = 'meta-llama/Meta-Llama-3.1-8B-Instruct-Reference',)
At set intervals during training, the model will be evaluated on your validation set, and the evaluation loss will be recorded in your job event log. If you provide a W&B API key, you’ll also be able to see these losses in the W&B dashboard.RecapFine-tuning LLMs with Together AI allows you to create specialized models tailored to your specific requirements. By following this guide, you’ve learned how to:
Prepare and format your data for fine-tuning
Launch a fine-tuning job with appropriate parameters
Monitor the progress of your fine-tuning job
Use your fine-tuned model via API or dedicated endpoints
Evaluate your model’s performance improvements
Work with advanced features like continued training and validation sets